Majesty
Majesty Restaurant Woocommerce Wordpress Theme.
- Created: 1/11/2015
- Last Update: 4/1/2016
- By: samathemes
- Theme Link: Majesty - Restaurant WooCommerce WordPress Theme
- Website: http://demo.eyethemes.com/
- Email: profile page
Hello, firstly I would like to thank you for purchasing "Majesty - Restaurant WooCommerce WordPress Theme.".
If you have any questions that are beyond the scope of this help file, please feel free to ask us via comments or use contact form in my profile page.
- Quick Links For Documentation
- 1- BLOG.
- 2- Slider.
- 3- Shortcodes.
- 4- Create Blocks using Visual Composer.
- 5- Create Visual composer Element like demo depend On Images..
- 6- Add instagram widget..
Update The child theme before the Majesty version 2.0.0
If you are using the child theme before the Majesty version 2.0.0, you need to edit the file functions.php in the chdild theme and replace code for the function sama_child_theme_enqueue_styles with this code
if ( ! function_exists( 'sama_child_theme_enqueue_styles' ) ) {
    function sama_child_theme_enqueue_styles() {
        wp_enqueue_style( 'style', get_stylesheet_uri(), '', SAMA_THEME_VER );
    }
    add_action( 'wp_enqueue_scripts', 'sama_child_theme_enqueue_styles', 200 );
}
Installation
To install this theme you must have a working version of WordPress already installed. If you do not have WordPress installed documentation is available on the WordPress website to help you.
This is helpfull Articles to Upload and Install Wordpress theme:
- Adding New Themes using the Administration Panel.
- Adding New Themes by using cPanel.
- Adding New Themes Manually(FTP).
- Selecting the Active Theme.
You can install the theme in two ways:
- WordPress: Navigate to Appearance -> Add New Themes -> Upload page. Select Majesty.zip file. Press the Install Now button to upload and install the theme;
- FTP: Extract Majesty.zip file and upload the extracted folder to /wp-content/themes/ folder on your server. Navigate to Appearance -> Themes and activate Majesty theme.
Activate the theme.
After you see that the theme has been successfully uploaded, you can click "Activate" to activate the theme. You may want to click "Preview" first just to make sure the theme won't break.
Please login fo WP Dashboard. You will see some instructions and informations about next installation steps
Important! When The Majesty theme is first activated and plugin the theme options must be configured and save. You can edit these settings on the Theme Options page under Appearance in the admin dashboard.
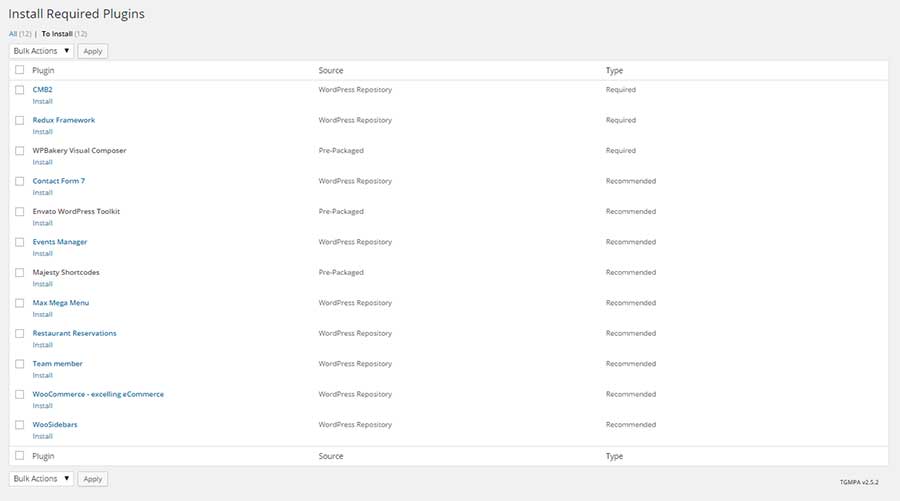
Install Required Plugins
- CMB2.
- Redux Framework.
- Woocommerce optional.
- Contact Form 7 optional..
- Events Manager optional..
- WP FullCalendar optional.
- Max Mega Menu optional.
- WooSidebars optional.
- Restaurant Reservations. optional.
- WPBakery Visual Composer
- Majesty Shortcodes [optional install it if you need to use majesty theme shortcode].
When you have successfully installed the theme , you will be asked to install the required plugins.

Import XML Demo Content
Important before use this steps you need to make some changes in php.ini in your localhost or live server.
upload_max_filesize = 12M
post_max_size = 13M
max_input_time = 300
max_execution_time = 300
Important to Mega menu work good you need some changes in php.ini file make max_input_vars 5000 please read this Menu Item Limit.
Important If you can't Change value in php.ini you lose mega menu when you import sql file, for import xml demo content you need to create menu because its don' import. but all pages import good please see section how to create menu.
Here you can find old import documentation.
- Create refresh version for wordpress.
- Active The Majesty theme.
- Then, you find message to tell you install required plugin install it.
- Go to pages and select all and select move to trash from dropdown and click apply, after that go to trash and select all pages and selct Delete Permanently from dropdown menu and click apply.
- When download majesty theme from Themeforest choose download all files and documentation, inside this folder > Dummy-Data > new-import > upload the plugin majesty-import-demo to your site and active it.
- Under appearance click import majesty demo.
- Click button import and this proceesor take from 20 - 30 minutes.
- Go to appearance > menus > Edit the theme mega menu and hover menu item click mega menu and add widget SAMA:: Menu Carousel.
Theme Update
You can update Majesty theme in two ways:
First
- Download the zipped package from ThemeForest and extract to your desktop.
- In the extracted package you will find archive majesty.zip, which is the WordPress theme
- Extract zip file and upload the extracted folder to /wp-content/themes/ folder on your server with overwriting.>
Second Automatic update
Setting Up Pages
In this section
- create Home page.
- Create Blog page.
- Page template for Majesty themes.
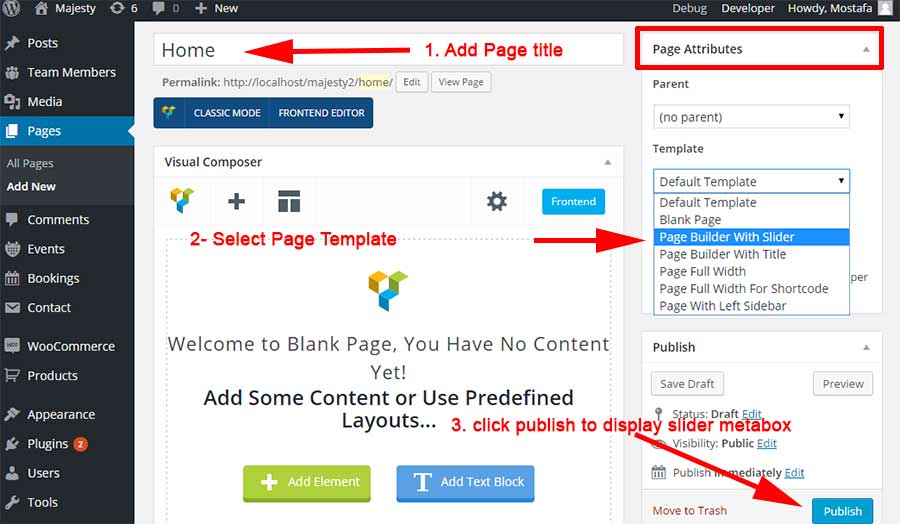
Home and Blog Page
- Create a new page, and assign it the template home.
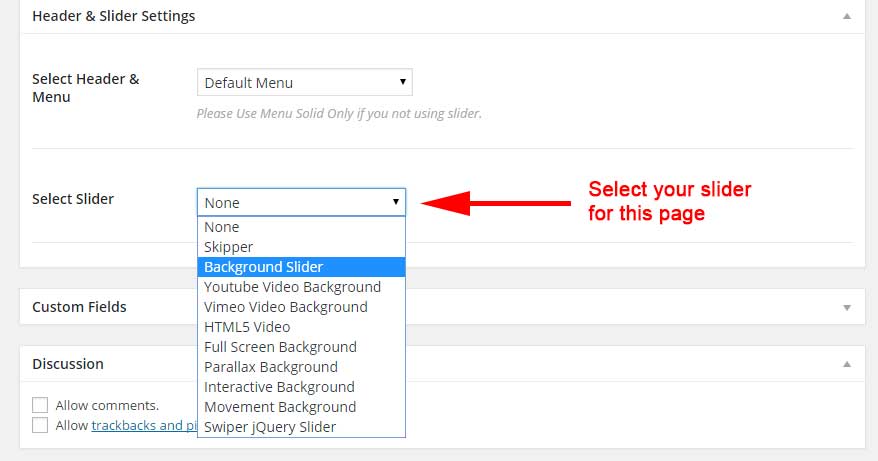
- From page Page Attributes select page template Builder with slider and click publish to display slider metabox.
- Create a new page, and assign it the template blog.
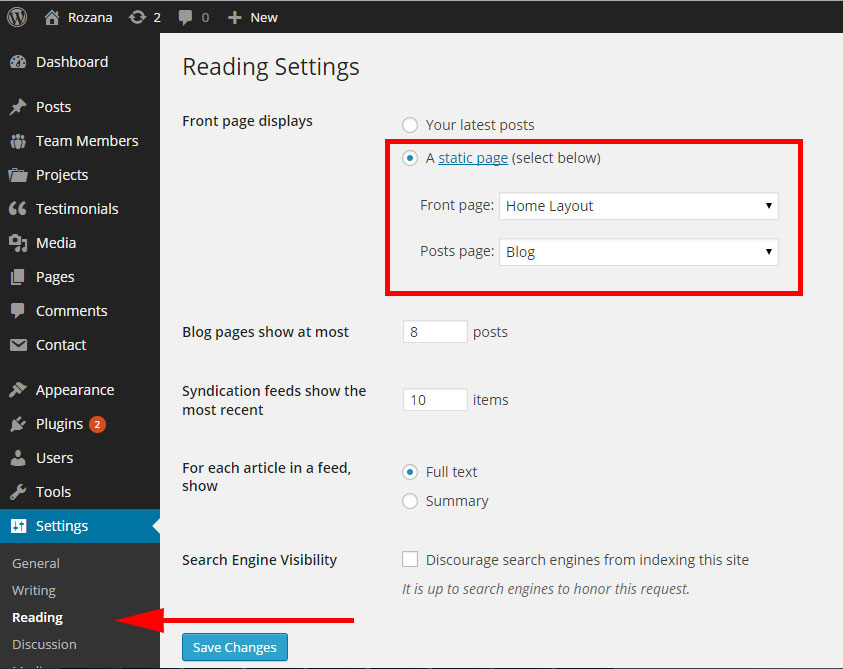
- Go to Settings -> Reading, and change the "Front page displays" setting to "A static page", set the front page to your homepage, and "Posts Page" to the blog page you just created.
Page Templates
- Default Template used for any default site page.
- Blank Page useful for coming soon page or any page without menu and footer and you can use visual composer element.
- Page builder with slider. [Useful to create home layout using Visual Composer and top custom slider at top not display page title]
- Page builder with Title. [Useful to create about, contact, service page using Visual Composer and display page title not display top slider.
- Page Fullwidth used for any default site page but fullwidth no sidebar here.
- Page Fullwidth Shortcodes Great page if you plan to used shortcodes layout.
- Page Width Left Sidebar used for any default site page but sidebar is left.
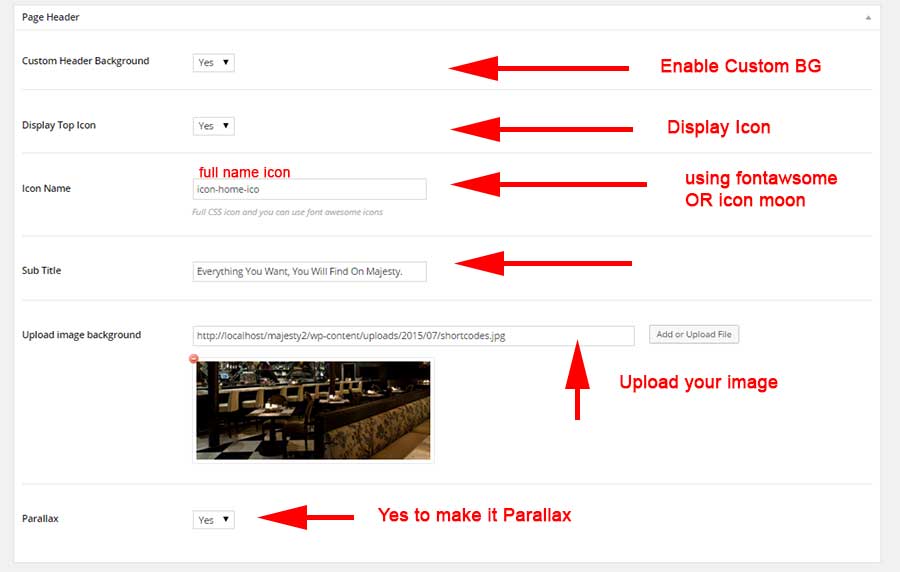
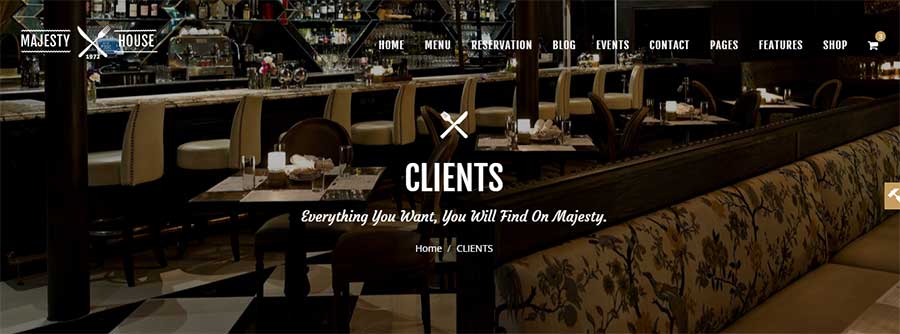
Create Header With Image
- Edit andy page Or Create new page page template [ page bilder top slider - Blank page title not working].
- From metabox Page Header
- Enable Custom Header Background and fill othere data and upload your custom image.
Visual Composer
menu
In this section
- Use Majesty Menu.
- Scroll menu. [ For landing and one page ].
- Mega Menu. ( Menu work Good Without max mega menu plugin if you don't need to use this plugin)
Theme come with 2 menu use topmenu is default and Second Top menu if you plain to your web site to have one page beside your orginal site feelfree to use it and from theme option menu select page to display this menu.
- Top menu. [default]
- Second Top menu. [only display if you select page to display from theme option] go to theme options > menu > Second Menu Pages and select pages to display this menu
- to make menu have nice scroll. this is useful for one page site go to theme options > menu > Scroll Menu and select pages to display nice scroll
If your site is onepage our landing page please use top menu and make it scroll.

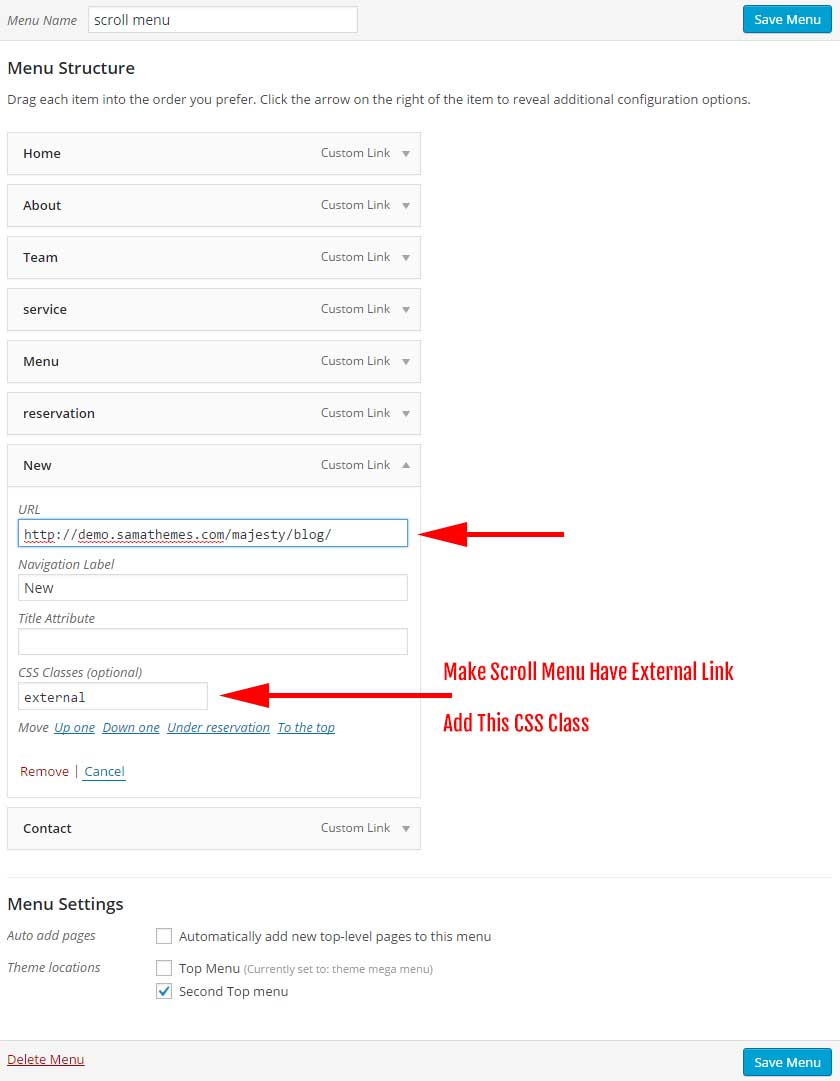
Create Scroll menu useful for landing page and one page
If your web site is only one page use top menu go to theme options > menu > Scroll Menu and select pages to display nice scroll.
If your web site is only one page and have blog use top menu as default menu, and do this step.
- Top menu. [default]
- Second Top menu assign it to your home page go to theme options > menu > Second Menu Pages and select pages to display this menu.
- Home Page assign it to be nice scroll go to theme options > menu > Scroll Menu and select pages to display nice scroll.
- ADD External Link to add external link to to menu one page add this css class to menu item 'external'.

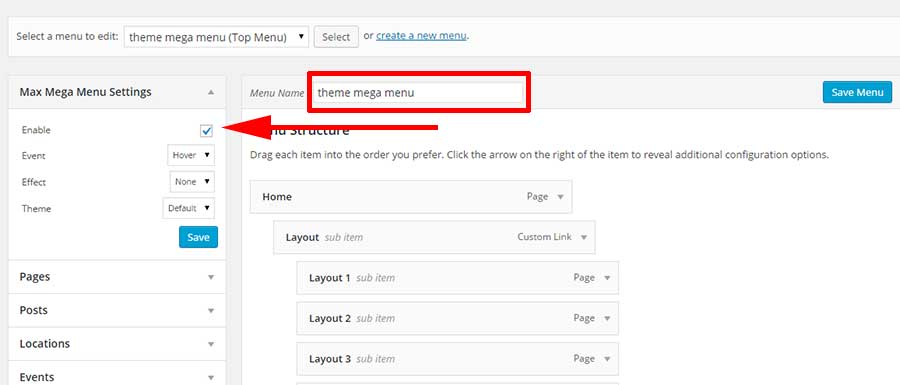
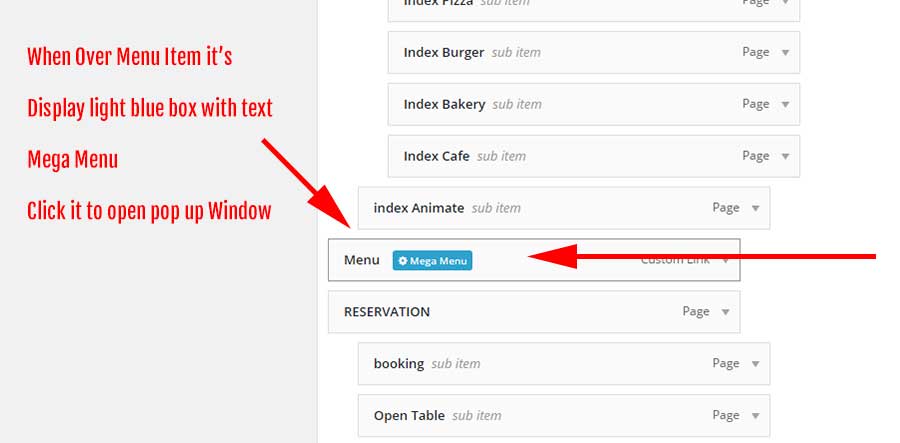
Mega Menu
This theme Compatible with plugin Max Mega Menu.
Important Before used this plugin its need some changes in php.ini file make max_input_vars 5000 please read this Menu Item Limit.
Important tuts video here & Documenatation .
- You need first to assign menu to theme locations.
- Edit menu you find Max Menu Settings check Enable.
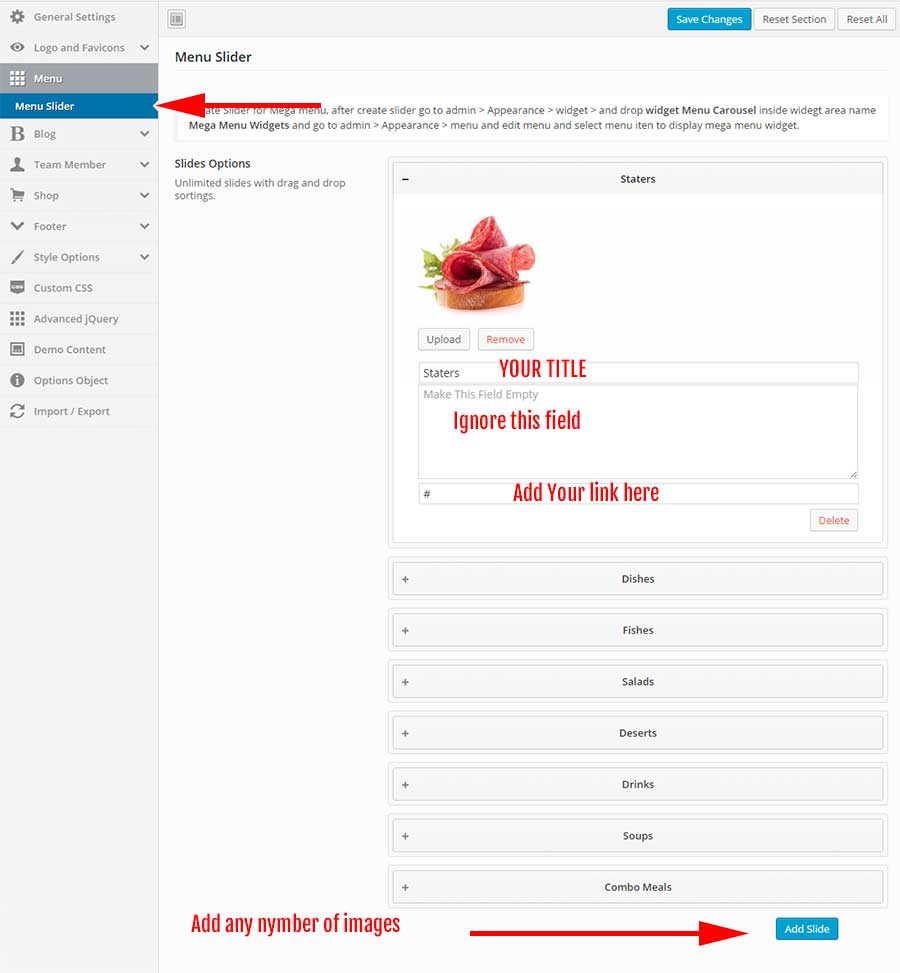
Create OWL Carouser like majesty demo under Menu item
- to assign menu item to be mega menu after create this item save menu.
- Click Menu Item You need to be has carouser. (see image)
- This open popup from dropdown menu select widget to add to the panel seclect SAMA:: Menu Carousel this display widget and select save
- Now You need To Add image Go to > theme options > Menu > Menu Slider and start upload your images with links.
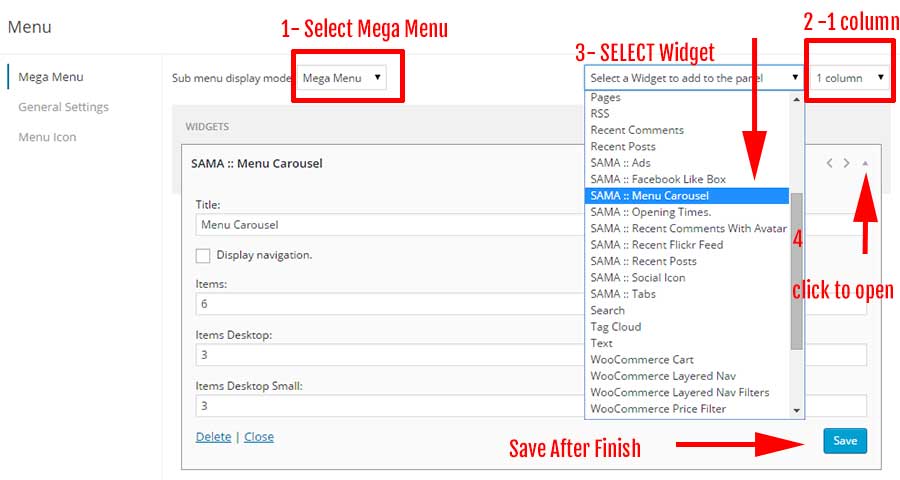
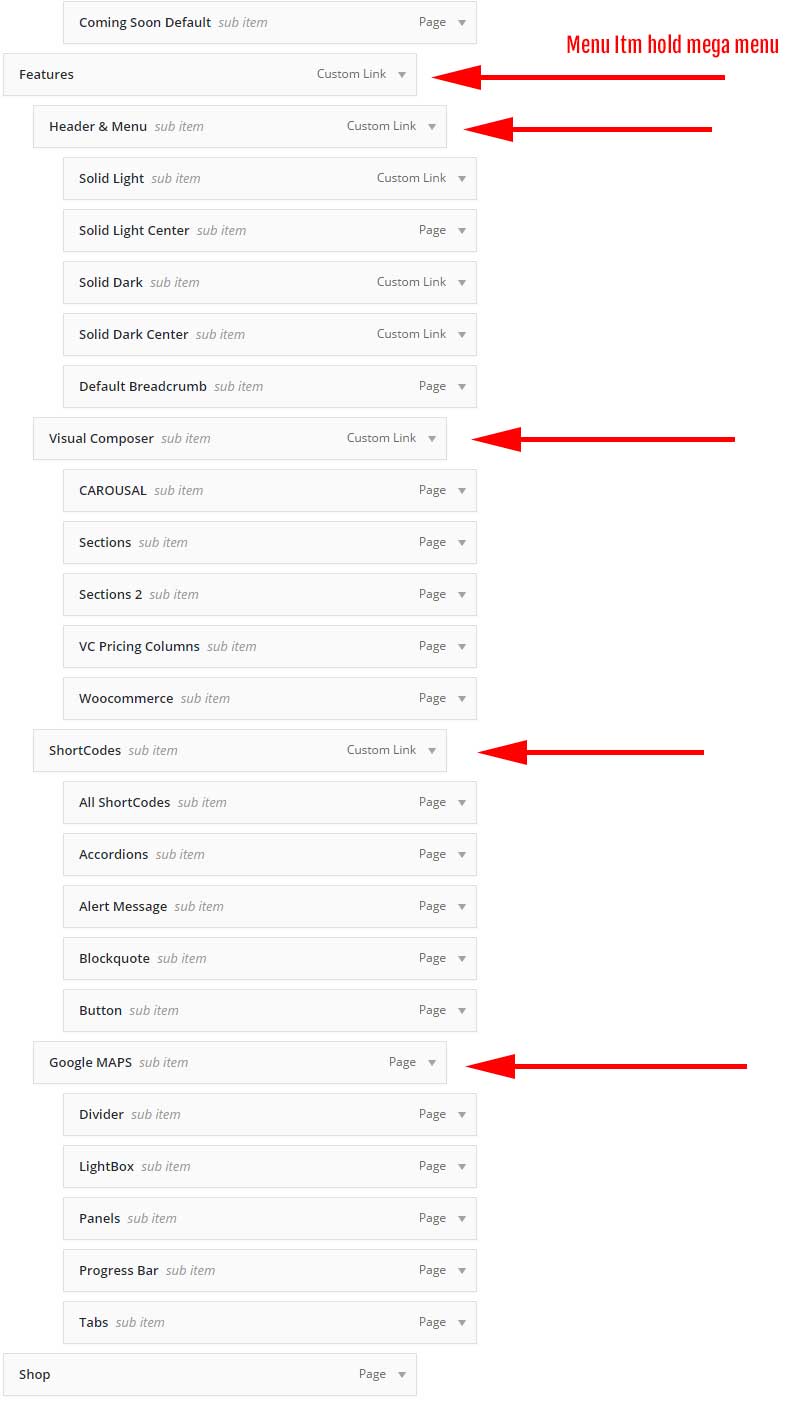
Create Menu item Has 4 Columns
- to assign menu item to be mega menu after create this item save menu.
- Create menu item that have nested element EX:: top level is (1) > second level has 4 menu item > each second level has any number for menu item
- Click Menu Item You need to be has 4 Columns. (see image)
Blog
Team Members
This requird active plugin Team member by WooThemes
Add member team information like post.
single team member you can select layout between Left sidebar, Right sidebar, Fullwidth.
To get link to your archive team member is http://yourdomain/team-members/.
WooCommerce
All woocommerce shortcode display good in theme you can use visual composer user interface or wooshortcode but for attributes columns make its value one of this [grid, grid4col, gridfullwidth, masonry, masonryfullwidth, list]
Events
This requird active plugin Events Manager
Please read documentation.
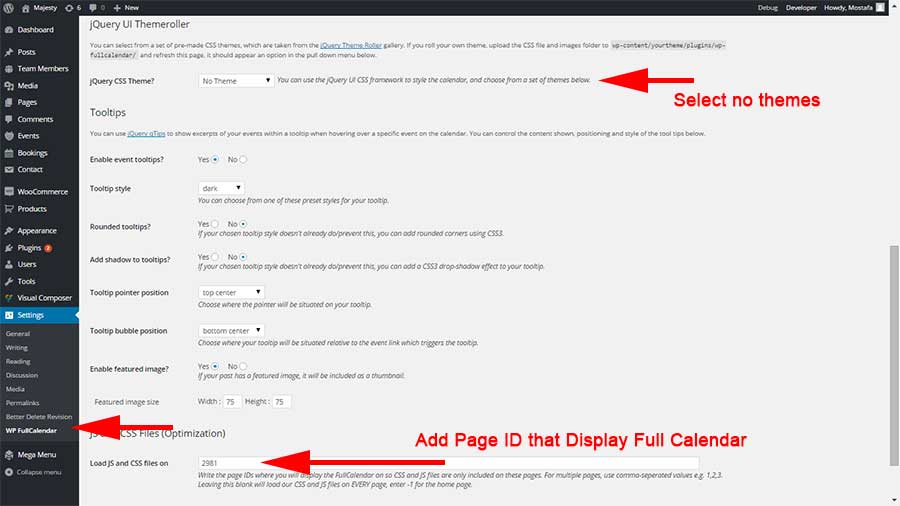
If you need this page Events you need to used this plugin jQuery FullCalendar by Adam Shaw and after install it go to wpadmin > settings > WP FullCalendarand in jQuery CSS Theme? select no themes, and in Load JS and CSS files on add your page ID used to display Full Calendar this is important step this page contain shortcode [fullcalendar].
Resturant Reservations Plugin
This requird active plugin Restaurant Reservations
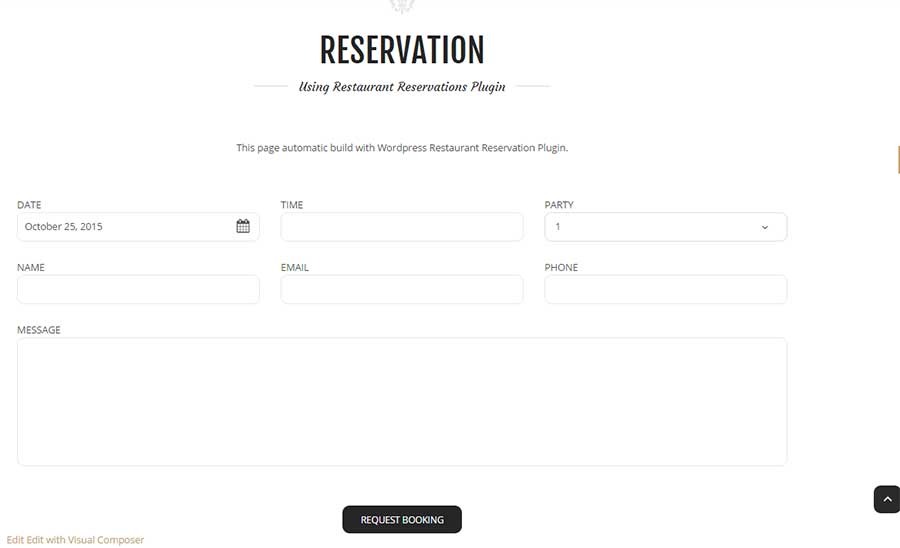
please read documentation for this plugin, and you can use it in home page or any other page using visual composer Restaurant Reservations plugin
in plugin settings select page to make it booking.
Contact Form 7 Plugin
This requird active plugin Contact Form 7
You can use this plugin for reservation by email OR as contactus in majesty we used it as reservation and for contactus page you.
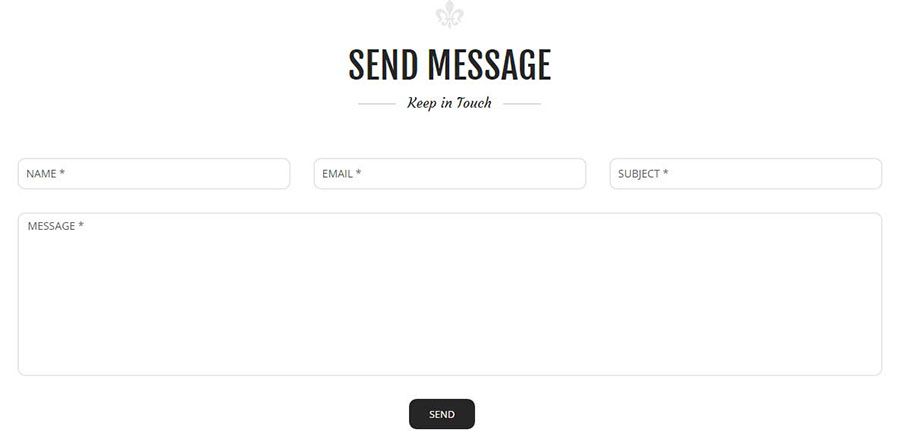
contactus 2 columns
<div class="contact-form style1 clearfix">
	<div class="col-md-6 nopadding">
		<div class="form-group">
			<div class="col-md-12 col-sm-12 col-sx-12">
				[text* name class:form-control class:text  placeholder "NAME *"]
			</div>
			<div class="col-md-12 col-sm-12 col-sx-12">
				[email* email class:form-control class:text placeholder "EMAIL *"]
			</div>
			<div class="col-md-12 col-sm-12 col-sx-12">
				[text subject class:form-control class:text placeholder "SUBJECT *"]
			</div>
		</div>
	</div>
	<div class="col-md-6 nopadding">
		<div class="form-group">
			<div class="col-md-12">
				<div class="element">
					[textarea* message class:text class:textarea 1x1 placeholder "MESSAGE *"]
				</div>
			</div>
		</div>
	</div>
	<div class="col-md-12">
	[submit class:btn class:btn-gold "Send"]
	</div>
</div>
contactus 1 columns
<div class="contact-form clearfix contact-page">
	<div class="form-group">
		<div class="col-md-4 col-sm-4 col-sx-12">
			[text* name class:form-control class:text  placeholder "NAME *"]
		</div>
		<div class="col-md-4 col-sm-4 col-sx-12">
			[email* email class:form-control class:text placeholder "EMAIL *"]
		</div>
		<div class="col-md-4 col-sm-4 col-sx-12">
			[text subject class:form-control class:text placeholder "SUBJECT *"]
		</div>
	</div>
	<div class="col-md-12">
        <div class="form-group">
            <div class="element">
				[textarea* message class:text class:textarea placeholder "MESSAGE *"]
			</div>
		</div>
	</div>
	<div class="col-md-12">
	[submit class:btn class:btn-black "Send"]
	</div>
</div>
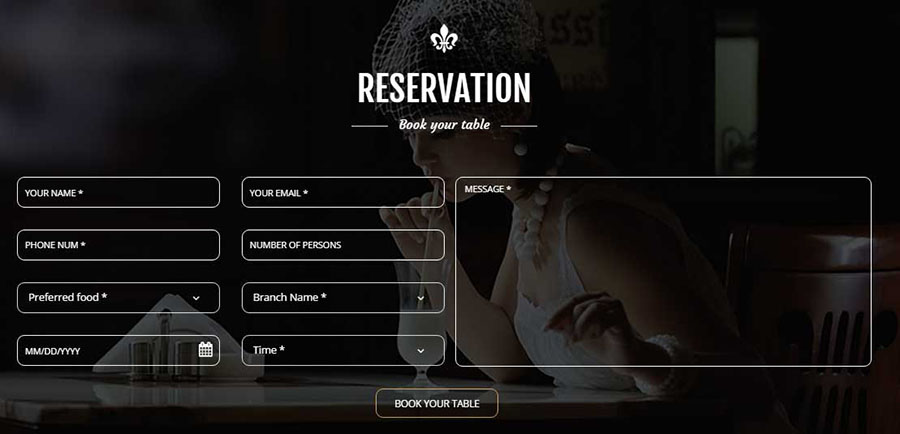
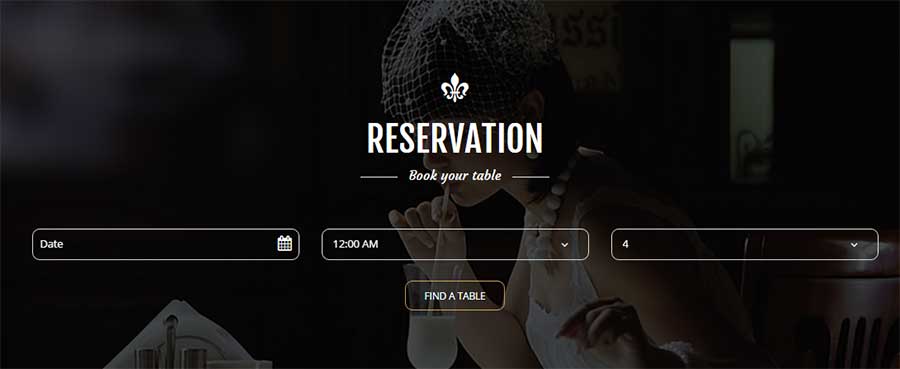
Reservation 2 columns
<div class="reserv_form reserv_style2 clearfix">
	<div class="col-md-6">
		<div class="row">
			<div class="form-group row">
				<div class="col-md-6 col-sm-6 col-sx-12">
					[text* name class:form-control placeholder "Your Name *"]
				</div>
				<div class="col-md-6 col-sm-6 col-sx-12">
					[email* email class:form-control placeholder "Your EMAIL *"]
				</div>
				<div class="col-md-6 col-sm-6 col-sx-12">
					[tel* tel-104 id:telephone-rev class:form-control placeholder "PHONE NUM *"]
				</div>
				<div class="col-md-6 col-sm-6 col-sx-12">
					[number* numpersons class:form-control placeholder "Number of Persons"]
				</div>
				<div class="col-md-6 col-sm-6 col-sx-12">
					<div class="select_wrap">
				[select* preferred class:form-control first_as_label "Preferred food *" "one" "two" "three" "four" "five"]
			</div>
				</div>
				<div class="col-md-6 col-sm-6 col-sx-12">
					<div class="select_wrap">
		[select* branchname id:branchname class:form-control first_as_label "Branch Name *" "BRANCH ONE" "BRANCH TWO" "BRANCH THREE" "BRANCH FOUR" "BRANCH FIVE"]
                </div>
				</div>
				<div class="col-md-6 col-sm-6 col-sx-12 datepicker">
					 [date* date-res class:form-control min:today placeholder "DATE *"]<i class="fa fa-calendar"></i>
				</div>
				<div class="col-md-6 col-sm-6 col-sx-12">
					 <div class="select_wrap">
		[select* revtime id:revtime class:form-control first_as_label "Time *" "7:00" "8:00" "9:00" "10:00" "11:00" "12:00" "13:00" "14:00" "15:00" "16:00" "17:00" "18:00" "19:00" "12:00"]
                </div>
				</div>
			</div>
		</div>
	</div>
	<div class="row">
	<div class="col-md-6">

		<div class="form-group">[textarea* message class:text class:textarea placeholder "MESSAGE *"]</div>
       </div>
	</div>
	<div class="col-md-12 text-center">[submit class:btn class:btn class:btn-gold class:white "BOOK YOUR TABLE"]</div>
</div>
Reservation 1 columns
<div class="reserv_form clearfix">
	<div class="form-group row">
		<div class="col-md-3 col-sm-6 col-sx-12">
			[text* name class:form-control placeholder "Your Name *"]
		</div>
		<div class="col-md-3 col-sm-6 col-sx-12">
			[email* email class:form-control placeholder "Your EMAIL *"]
		</div>
		<div class="col-md-3 col-sm-6 col-sx-12">
			[tel* tel-104 id:telephone-rev class:form-control placeholder "PHONE NUM *"]
		</div>
		<div class="col-md-3 col-sm-6 col-sx-12">

[number* numpersons class:form-control placeholder "Number of Persons"]

		</div>
	</div>
	<div class="form-group row">
		<div class="col-md-3 col-sm-6 col-sx-12">
		<div class="select_wrap">
				[select* preferred class:form-control first_as_label "Preferred food *" "one" "two" "three" "four" "five"]
			</div>
		</div>
		<div class="col-md-3 col-sm-6 col-sx-12">
                <div class="select_wrap">
		[select* branchname id:branchname class:form-control first_as_label "Branch Name *" "BRANCH ONE" "BRANCH TWO" "BRANCH THREE" "BRANCH FOUR" "BRANCH FIVE"]
                </div>
		</div>
		<div class="col-md-3 col-sm-6 col-sx-12 datepicker">
	           [date* date-res class:form-control min:today placeholder "DATE *"]<i class="fa fa-calendar"></i>
		</div>
		<div class="col-md-3 col-sm-6 col-sx-12">
                      <div class="select_wrap">
		[select* revtime id:revtime class:form-control first_as_label "Time *" "7:00" "8:00" "9:00" "10:00" "11:00" "12:00" "13:00" "14:00" "15:00" "16:00" "17:00" "18:00" "19:00" "12:00"]
                </div>
		</div>
	</div>
	<div class="form-group">
		[textarea* message class:text class:textarea placeholder "MESSAGE *"]
	</div>
	<div class="col-md-12 text-center">
		[submit class:btn class:btn class:btn-gold class:white "BOOK YOUR TABLE"]
	</div>
</div>
Open table Web site
From popup Visual composer click tab by samathemes and select open table and add id for your resturant.
Add instagram widget
To Add instagram widget you need to create API access token, to do this follow this steps
- Read this tutorial How to get Instagram API access token and fix your broken feed.
- in step 2 you can ignore localhost if you don't use it and add you live site.
- Ignore step 5 if you don't use localhost.
- in step 6 for URL link replace client id with your client id code and localhost with your live site like http://demo.eyethemes.com/majesty
- now copy your access token code and past it in widget.
- Ignore step 9.
Footer
Go to wordpress admin > Appearance > majesty Options > Footer.
- Select Footer Widegt Type.
- You can hide bottom footer after widget.
- ADD Bottom footer content.
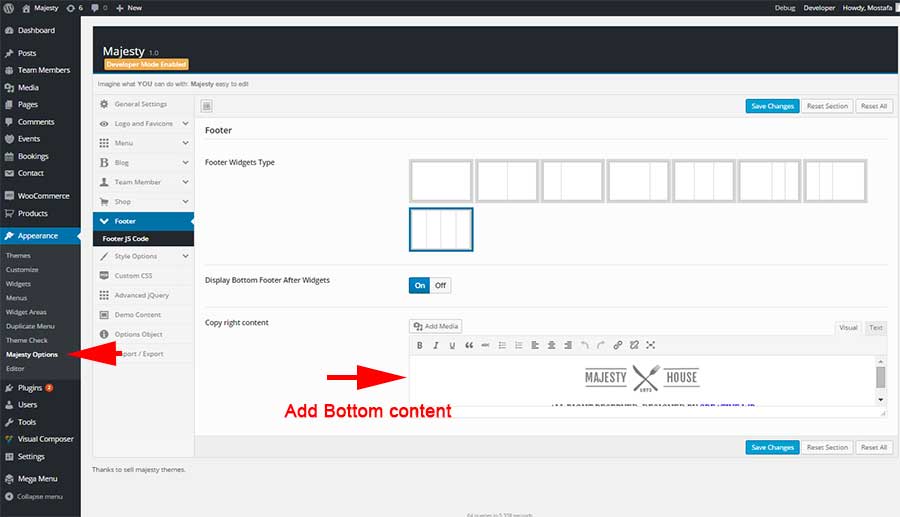
Majesty Theme HTML FOOTER please change your logo HTML.
<img class="img-responsive aligncenter" src="http://demo.samathemes.com/majesty/wp-content/uploads/2015/09/footer_logo.png" alt="footer_logo" />
<p style="text-align: center;">©2015 ALL RIGHT RESERVED. DESIGNED BY <a href="http://themeforest.net/user/samathemes/portfolio" target="_blank">SAMA THEMES</a></p>
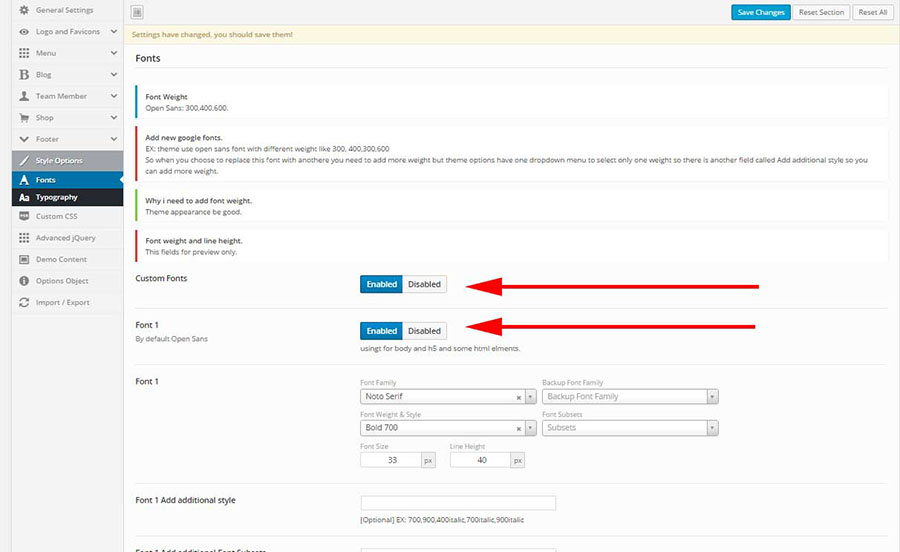
Google Fonts
Go to wordpress admin > Appearance > Majesty Options > Style Options > Fonts > click enable custom fonts
Majesty themes used 3 fonts Open Sans, Fjalla One, courgette so you can easy replace any font used in theme with another font.
Add new google fonts.
EX: theme use open sans font with different weight like 300, 400,300,600
So when you choose to replace this font with anothere you need to add more weight but theme options have one dropdown menu to select only one weight so there is another field called Add additional style so you can add more weight.
Translation
- Open the /majesty/languages/ folder and duplicate the en_US.po file, then rename it to your desired language code. For example; for German you need to re-name it as de_DE.po for Spanish es_ES.po for Turkish tr_TR.po etc. You can find all the codes from this link http://codex.wordpress.org/WordPress_in_Your_Language
- Then you will need to open the .po file in PO Edit. Once opened, you will see all strings that needs to be translated. Type the translation of a string into the "Translation" column. Do not delete or edit "Original string" part. When you finish translating, save the file. This will create an .mo file in the same directory.
- Upload the new files into the languages folder of the theme /wp-content/themes/majesty/languages/ and then follow this guide: http://codex.wordpress.org/Installing_WordPress_in_Your_Language#Single-Site_Installations
- download poedit
Coming Soon Video
- Create a new page, and add title for this page.
- From page Page Attributes select Blank Page.
- click publish to display slider metabox
- Create HTML5 Video Background here.
- Add Content with shortcode countdowntime like code under, and don't forget to to change date.
- Important in this slider i add shortcode to countdown time thats need specific jQuery. you need to load jQuery for this. to do that go to theme options > advanced jQuery > Countdown Jquery Jquery and select this page to load jQuery countdown in this page.
<div class="coming-soon"><div class="slider-content">
<div id="logo">
<a href="#" class="light-logo"><img src="#" alt="Logo"></a>
</div>
    <h3>We are glad to see you, But please be patient, This page is under construction</h3>
    [sama_countdown date="2015/11/7" rtl="false" dayslabel="Days" hourslabel="Hours" minuteslabel="Minutes" secondslabel="Seconds" cssclass=""]<h3>This is Countdown Message if Countdown Expire.</h3>[/sama_countdown]
    <p>If you have any questions, comments, or suggestions, please click <a class="underline" href="mailto:someone@yoursite.com">here</a> to mail me.</p>
        <ul class="social">
          <li><a href="#" data-toggle="tooltip" title="Facebook"><i class="fa fa-facebook"></i></a></li>
          <li><a href="#" data-toggle="tooltip" title="Twitter"><i class="fa fa-twitter"></i></a></li>
          <li><a href="#" data-toggle="tooltip" title="Google+"><i class="fa fa-google-plus"></i></a></li>
          <li><a href="#" data-toggle="tooltip" title="Behance"><i class="fa fa-behance"></i></a></li>
        </ul>
</div></div>
Coming Soon Slider
- Create a new page, and add title for this page.
- From page Page Attributes select Blank Page.
- click publish to display slider metabox
- Create Background Slider here and change this attributes
- in field Timer set 5000.
- in field effTimer set 5000.
- Add Content with shortcode countdowntime like code under, and don't forget to to change date.
- Important in this slider i add shortcode to countdown time thats need specific jQuery. you need to load jQuery for this. to do that go to theme options > advanced jQuery > Countdown Jquery Jquery and select this page to load jQuery countdown in this page.
<div class="coming-soon"><div class="slider-content dark">
	<div id="logo">
		<a href="#" class="light-logo"><img src="#" alt="Logo"></a>
	</div>
	<h3>WE ARE GLAD TO SEE YOU, BUT PLEASE BE PATIENT, THIS PAGE IS UNDER CONSTRUCTION</h3>
[sama_countdown date="2015/11/7" rtl="false" dayslabel="Days" hourslabel="Hours" minuteslabel="Minutes" secondslabel="Seconds" cssclass=""]<h3>This is Countdown Message if Countdown Expire.</h3>[/sama_countdown]
<p>If you have any questions, comments, or suggestions, please click <a class="underline" href="mailto:someone@yoursite.com">here</a> to mail me.</p>
	<ul class="social">
		<li><a href="#" data-toggle="tooltip" title="Facebook"><i class="fa fa-facebook"></i></a></li>
		<li><a href="#" data-toggle="tooltip" title="Twitter"><i class="fa fa-twitter"></i></a></li>
		<li><a href="#" data-toggle="tooltip" title="Google+"><i class="fa fa-google-plus"></i></a></li>
		<li><a href="#" data-toggle="tooltip" title="Behance"><i class="fa fa-behance"></i></a></li>
	</ul>
</div></div>
Coming Soon Default
- Create a new page, and add title for this page.
- From page Page Attributes select Blank Page.
- click publish to display slider metabox
- Create Full Screen Background here.
- Add Content with shortcode countdowntime like code under, and don't forget to to change date.
- Important in this slider i add shortcode to countdown time thats need specific jQuery. you need to load jQuery for this. to do that go to theme options > advanced jQuery > Countdown Jquery Jquery and select this page to load jQuery countdown in this page.
<div class="coming-soon"><div class="slider-content dark">
	<div id="logo">
		<a href="#" class="light-logo"><img src="#" alt="Logo"></a>
	</div>
	<h3>WE ARE GLAD TO SEE YOU, BUT PLEASE BE PATIENT, THIS PAGE IS UNDER CONSTRUCTION</h3>
[sama_countdown date="2015/11/7" rtl="false" dayslabel="Days" hourslabel="Hours" minuteslabel="Minutes" secondslabel="Seconds" cssclass=""]<h3>This is Countdown Message if Countdown Expire.</h3>[/sama_countdown]
<p>If you have any questions, comments, or suggestions, please click <a class="underline" href="mailto:someone@yoursite.com">here</a> to mail me.</p>
	<ul class="social">
		<li><a href="#" data-toggle="tooltip" title="Facebook"><i class="fa fa-facebook"></i></a></li>
		<li><a href="#" data-toggle="tooltip" title="Twitter"><i class="fa fa-twitter"></i></a></li>
		<li><a href="#" data-toggle="tooltip" title="Google+"><i class="fa fa-google-plus"></i></a></li>
		<li><a href="#" data-toggle="tooltip" title="Behance"><i class="fa fa-behance"></i></a></li>
	</ul>
</div></div>
Credit
jQuery
- Fontawesome
- Icomoon
- jQuery
- Cordrops
- Google Web fonts
- Bootstrap
- Modernizr
- Istope
- Owl Carousel
- Zooming Slider
- Stellar
- Swiper
- gMap
- Countdown
- Flicr Feed
- Superfish Menu
- Pretty Photo Lightbox
- FitVid
- Easing
- jQuery Appear
Images used in the Demo
All images and videos used in the demo are not distributed with the theme. They are all licensed under Creative Commons and credited to their respective creator/owner.