Visual Composer
Visual composer documentation is an essential part of theme , visual composer developers have created an awesome documentation for vc , if you are unfamiliar with visual composer please read vc documentation. We have created several componets for visual composer , click here to view images for block you need to create and click image to go documentation for this block.
Please read documentation for work with row column and add custom heading.
Visual Composer Row
How to Add Row and Column with Visual Composer for WordPress video
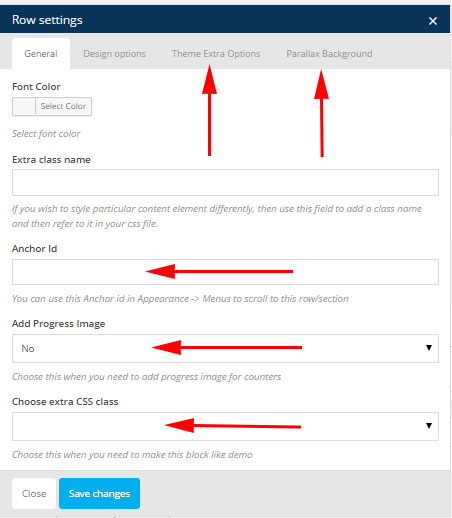
Rozana themes add many parameter to row element like:
- Anchor Id
- Add Progress Image [used when create OUR PROCESS TO SUCCESS block].
- Anchor Id
- dropdown menu to select CSS class when creating some blocks
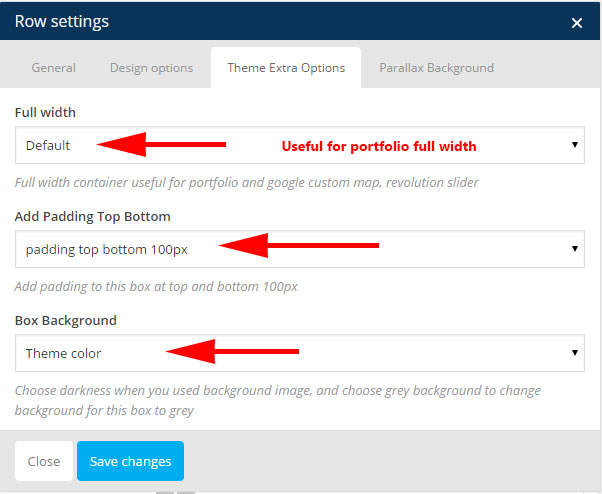
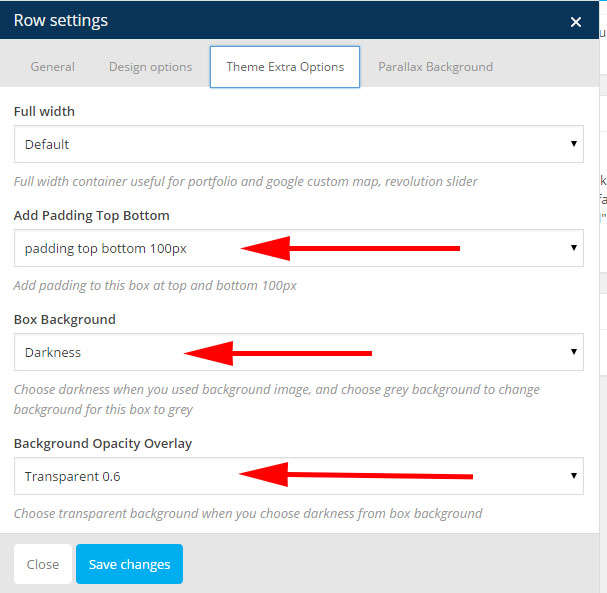
- Tab Theme Extra options
- Full Width dropdown [block fullwidth or default]. [full width useful for display portfolio or custom google maps]
- CSS Class for padding
- Box Background [themecolor - grey background - darkness]. Darkness[ useful when using background image]
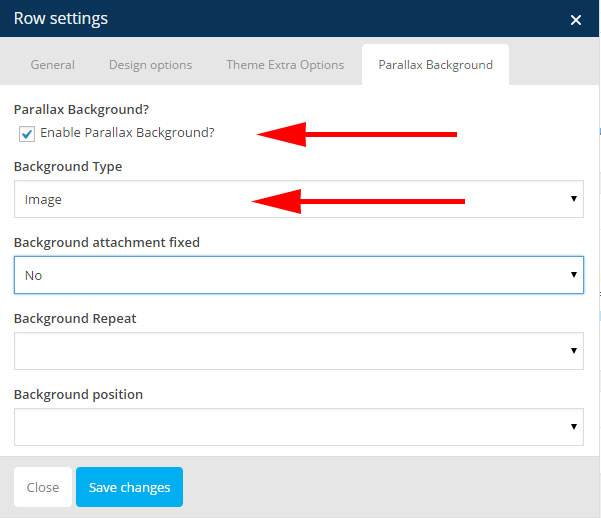
- Tab Parallax Background. [used to create parallax image Or video Background].
- Choose extra CSS Class. [from dropdown menu]
- Welcome Box with dark background. [used in this block]
- Add pattern to transparent. [used in this block]
- Details. [used in this block]
- Service Block. [used in this block]
- Pricing table without margin. [used in this block]
- Make H1, h2, h3 color White. [used in this block]
- banners Block text. [used in this block]
- FAQ Links. [used to create links in faq page it demo]
- Block have Accordions With Google maps. [used in this block and block]
- Block have Contact us information. [used in this block]
- comming soon page style 3.
Visual Composer Column
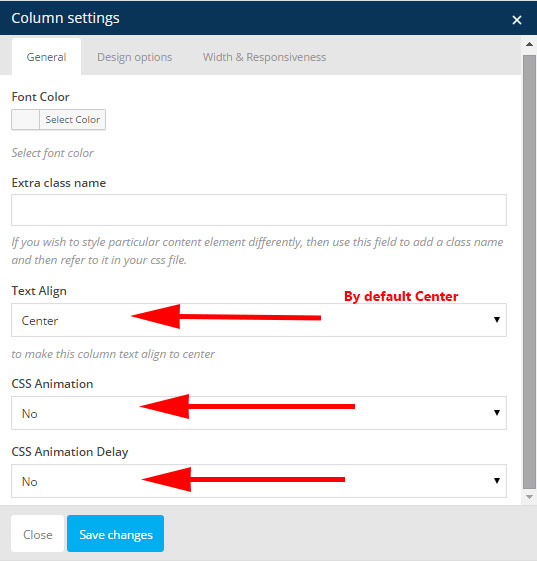
Rozana themes add many 3 parameter to Column element like:
- Text Align by default center.
- CSS Animation type. [Useful when element not have css animation]
- CSS Animation Delay.
Create Parallax Background
- Edit row settings click design options tab upload your image.
- click Parallax Background tab and check enable Parallax Background
- From Background type dropdown menu select image.
- click theme Extra Options tab.
- Field Box Background select Darkness.
- Field Background Opacity Overlay select transparent value you need best is 0.7.
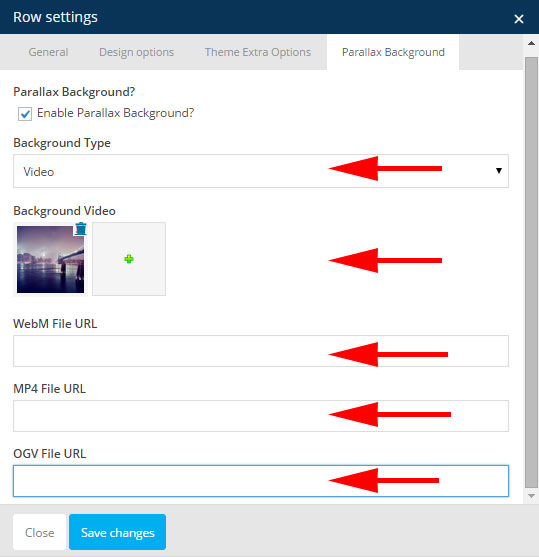
Create Video Background
- Edit row settings click Parallax Background.
- Check enable Parallax Background
- From Background type dropdown menu select video.
- Upload Background image for video.
- Add 3 URL links to Video.
- click theme Extra Options tab.
- Field Box Background select Darkness.
- Field Background Opacity Overlay select transparent value you need best is 0.7.
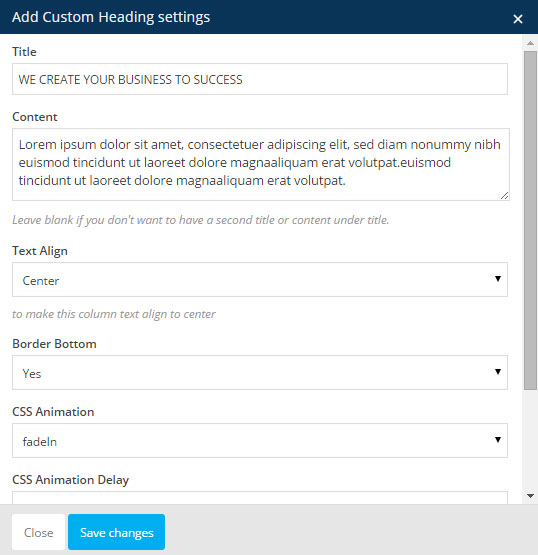
Add Custom Heading
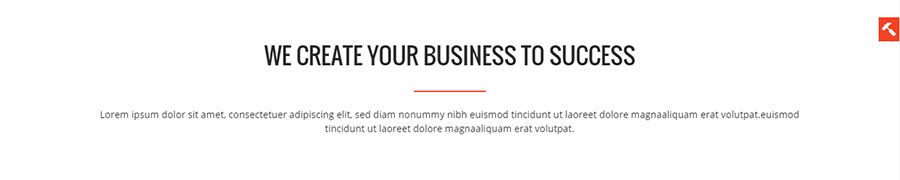
- From Visual composer click add new element open popup.
- click tab by samathemes.
- click Add custom heading.
- Add your title and content and select animation you need.
- Save changes.
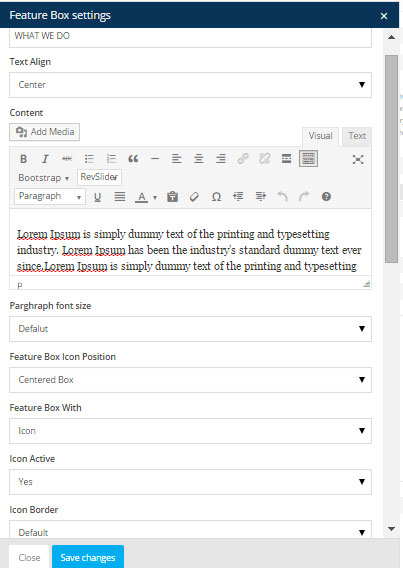
Feature Box -Block 1

- From Visual composer click add new element open popup.
- click tab by samathemes.
- click Feature Box.
- Add your title.
- Text Align select center.
- Add Your content.
- Parghraph font size select default.
- Feature Box Icon Position select centered box.
- Feature Box With select icon
- Icon Active. [for first block select active]
- Icon Border select default.
- Icon Rounded corner make it empty.
- Icon font size select default 36px.
- Icon line height select default 70px.
- Featured Icon select your icon.
- Add button URL and text.
- Finaly Add animation.
Feature Box - Style 2 -Block 1
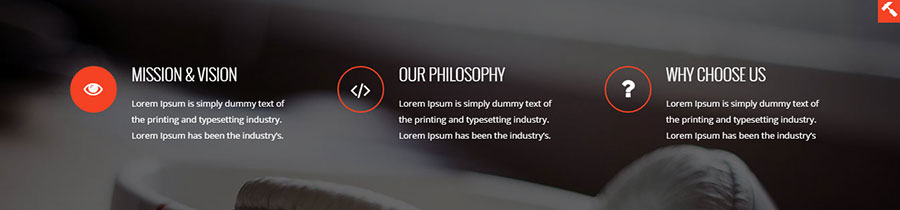
- From Visual composer click add new element open popup.
- click tab by samathemes.
- click Feature Box.
- Add your title ex: MISSION & VISION.
- Text Align select Left.
- Add Your content.
- Parghraph font size select default.
- Feature Box Icon Position select icon side.
- Feature Box With select icon
- Icon Active. [for first block select active]
- Icon Border select default.
- Icon Rounded corner make it yes.
- Icon font size select 26px.
- Icon line height select 65px.
- Featured Icon select your icon.
- button URL and text empty.
- Finaly Add animation.[fadeinup]
Feature Box - Style 3 -Block 1
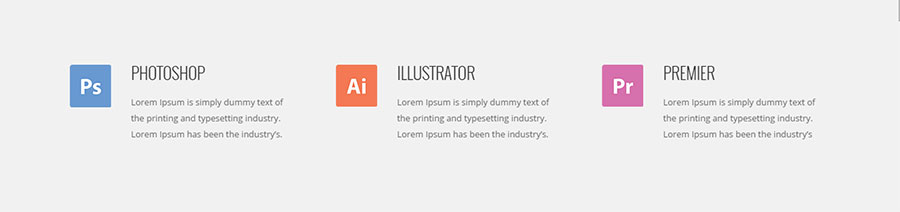
- From Visual composer click add new element open popup.
- click tab by samathemes.
- click Feature Box.
- Add your title ex: PHOTOSHOP.
- Text Align select Left.
- Add Your content.
- Parghraph font size select default.
- Feature Box Icon Position select icon side.
- Feature Box With select image and upload your image.
- button URL and text empty.
- Finaly Add animation.[fadeinup]
Feature Box - Style 4 -Block 1
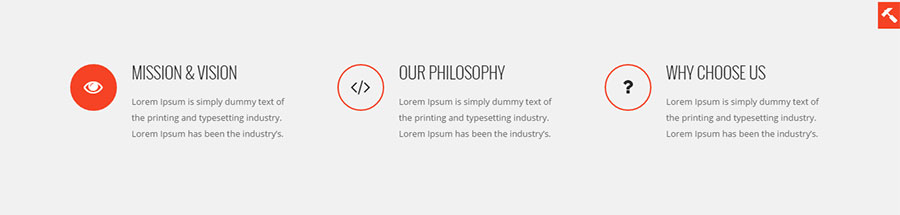
- Edit row settings and select grey background.
- view Feature box style 2.
Feature Box - Style 5 -Block 1
- From Visual composer click add new element open popup.
- click tab by samathemes.
- click Feature Box.
- Add your title ex: ADDRESS.
- Text Align select Left.
- Add Your content.
- Parghraph font size select 15px.
- Feature Box Icon Position select icon side.
- Feature Box With select icon.
- Icon Active. [for first block select active]
- Icon Border select Grey.
- Icon Rounded corner make it yes.
- Icon font size select 36px.
- Icon line height select 70px.
- Featured Icon select your icon.
- button URL and text empty.
- Finaly Add animation.[fadeinup]
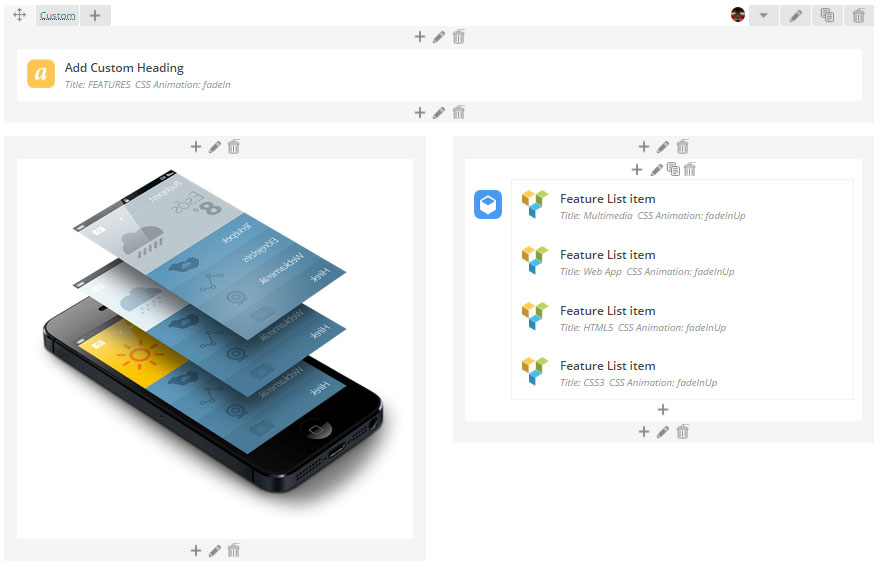
Feature List -Block 2

- make your row three column.
- Column 1.
- From popup Visual composer click tab by samathemes and select feature list container.
- For feature list container settings field icon align select Right.
- Click Save changes.
- Click + button inside feature list container.
- Click feature list item.
- Click edit feature list item.
- Add your title ex: iOS App.
- Icon Active empty.
- Featured Icon select your icon.
- Finaly Add animation.[fadeinup]
- Column 2
- Edit column 2 settings add new css class hide-mob [to hidden in mobile] and select animation you need.
- Add text block inside column 2 and insert image.
- Column 3.
- From popup Visual composer click tab by samathemes and select feature list container.
- For feature list container settings field icon align select Left.
- Click Save changes.
- Click + button inside feature list container.
- Click feature list item.
- Click edit feature list item.
- Add your title ex: Multimedia.
- Icon Active empty.
- Featured Icon select your icon.
- Finaly Add animation.[fadeinup]
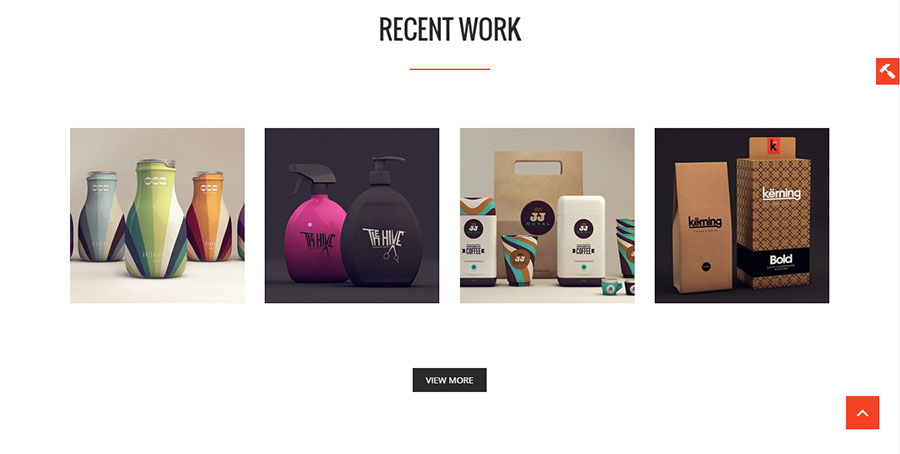
Portfolio Full Width -Block 3
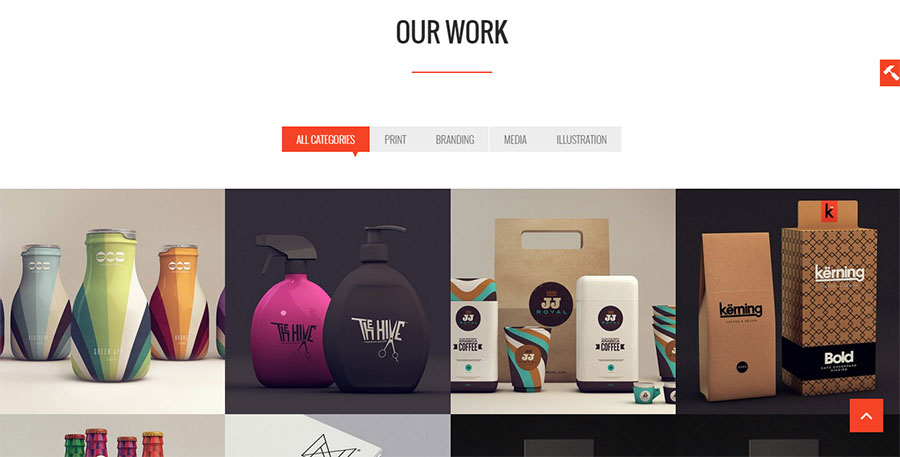
- Required plugin Projects by WooThemes.
- Edit row settings and from theme extra options tab for field full width select Full Width Container.
- From popup Visual composer click tab by samathemes and select Portfolio Full Width.
- Add number for portfolio items you need to display.
Team members carousel -Block 4
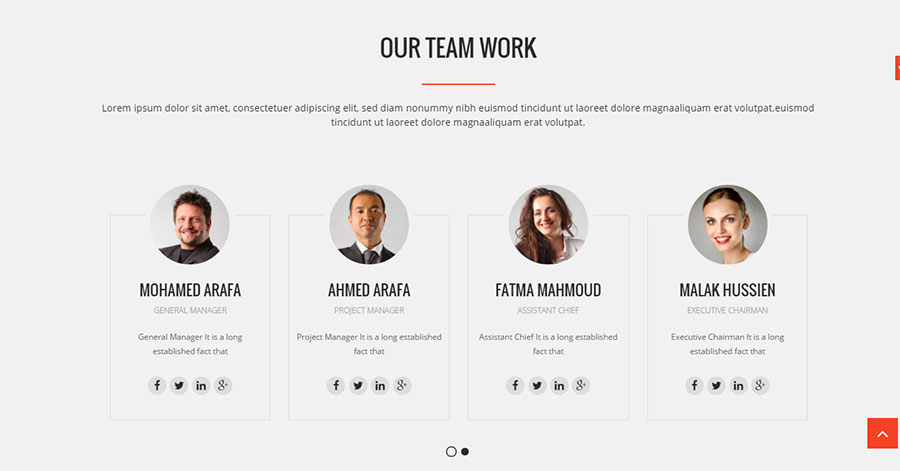
- Required plugin Team member by WooThemes.
- From popup Visual composer click tab by samathemes and select Team members carousel.
- you can display recent members or by id.
- If you select by id [use comma to Separates between ids].
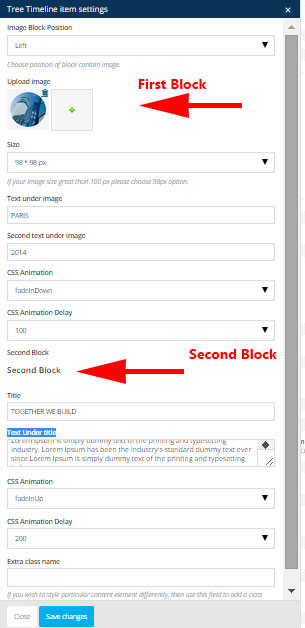
Tree Timeline -Block 5
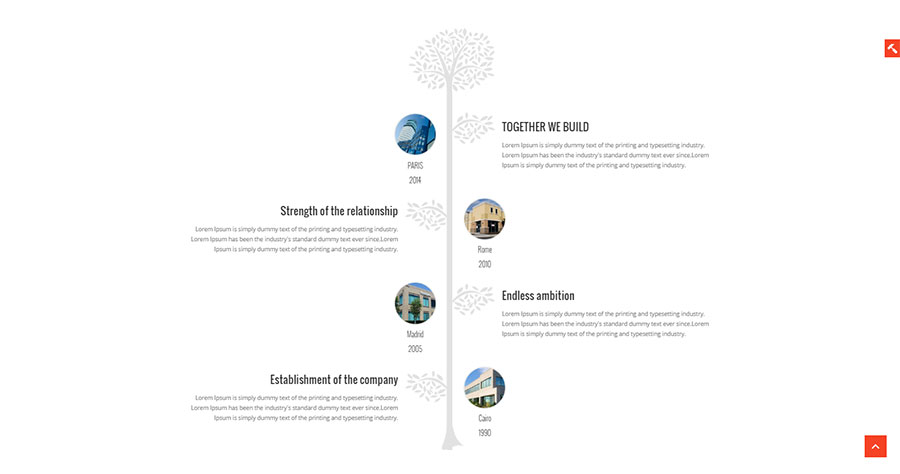
- From popup Visual composer click tab by samathemes and select Tree Timeline Container.
- Inside Tree Timeline Container Click + button and select tree timeline item.
- Edit tree timeline item settings.
- Field Image Block Position select left. [ if you need image in right select right]
- Field Size like demo 98*98px or make it empty to display full image.
- Field Text under image EX: PARIS.
- Field Second text under image EX: 2014.
- Select CSS animation for this block.
- Second Block
- Field Title Ex: TOGETHER WE BUILD.
- Field Text Under title add content you need.
- Select CSS animation for this block.
- Repeat this steps to get more blocks for tree time line.
Video Background -Block 6
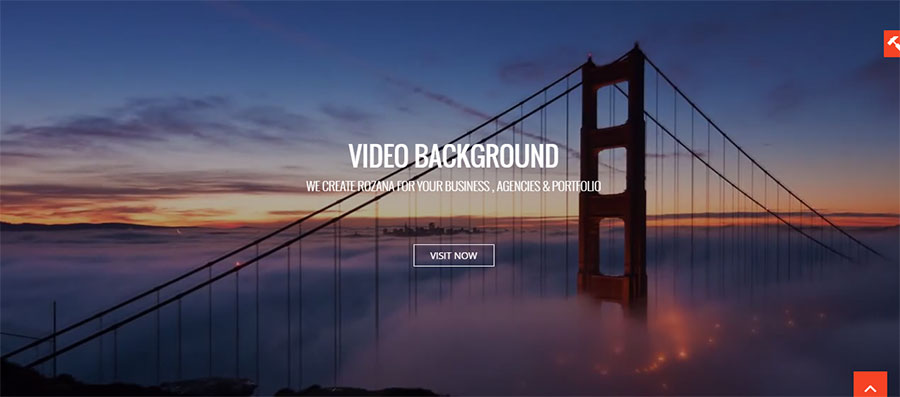
- Go to create video Background.
- Add text block from Visual composer
- Add this text inside text bloxk
<h1>VIDEO BACKGROUND</h1><h4>WE CREATE ROZANA FOR YOUR BUSINESS , AGENCIES & PORTFOLIO</h4><a class="slide-btn" href="#">VISIT NOW</a>
Counter -Block 7
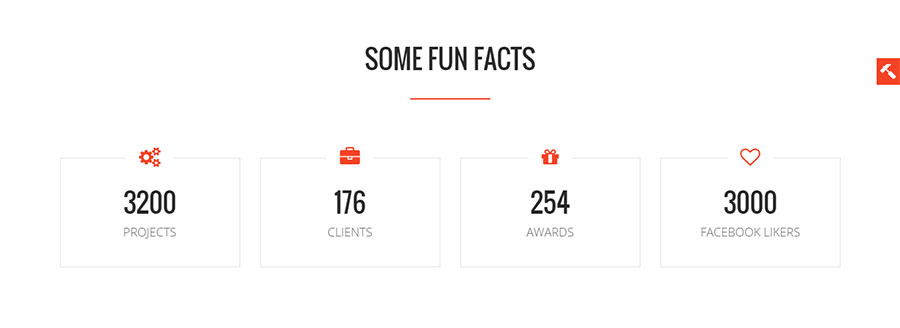
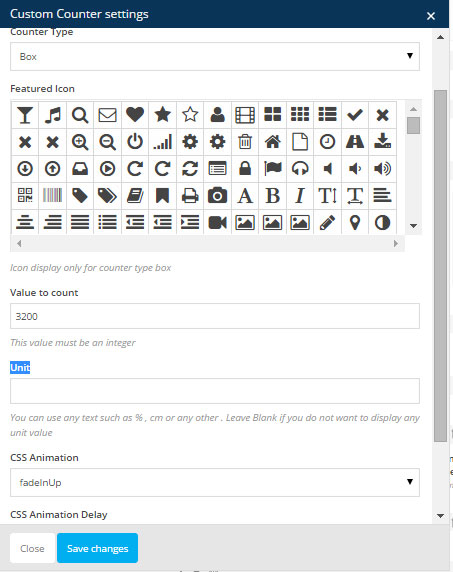
- make your row 4 column.
- For each column repeat this steps.
- From popup Visual composer click tab by samathemes and select custom counter.
- Field Title : Add your title ex: PROJECTS.
- Field Counter Type : select Box.
- Field Featured Icon : select icon.
- Field Value to count : ex: 3200.
- Field Unit : empty.
- Add CSS3 Animation and delay.
OUR PROCESS TO SUCCESS -Block 8
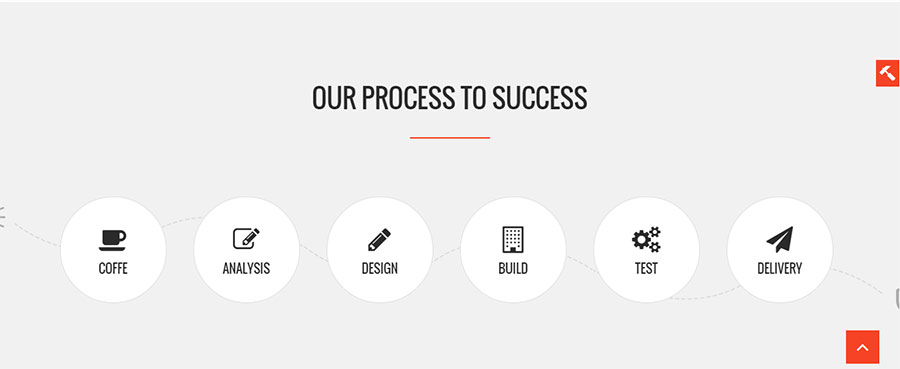
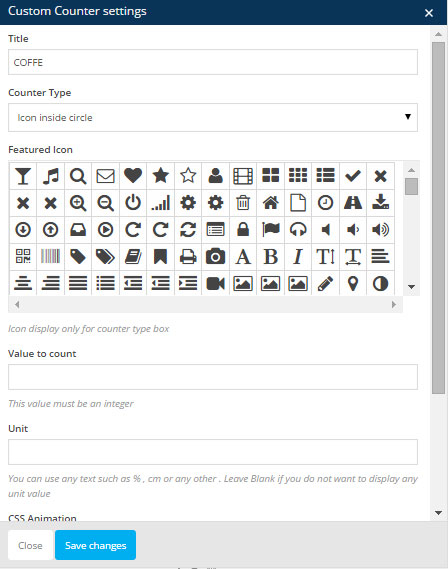
- make your row 6 column.
- Edit row settings and and from field add progress image select Yes.
- For each column repeat this steps.
- From popup Visual composer click tab by samathemes and select custom counter.
- Field Title : Add your title ex: COFFE.
- Field Counter Type : select Icon inside Circle.
- Field Featured Icon : select icon.
- Field Value to count : empty.
- Field Unit : empty.
- Add CSS3 Animation and delay.
Image OWL Carousel -Block 9

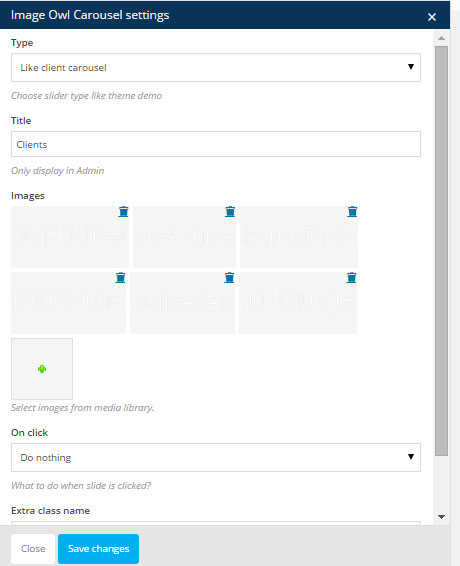
- From popup Visual composer click tab by samathemes and select Image OWL Carousel.
- Field type : select Like client carousel.
- Upload your images.
Block 10

- make your row 2 column.
- Column 1
- Add text block inside column and insert image and add CSS Class [img-responsive] to image.
- Column 2
- Add text block inside column and insert your content.
- create button like image.
<a class="btn-icon"><i class="fa fa-download"></i>Download Company Profile</a>
Testimonials Carousel -Block 11
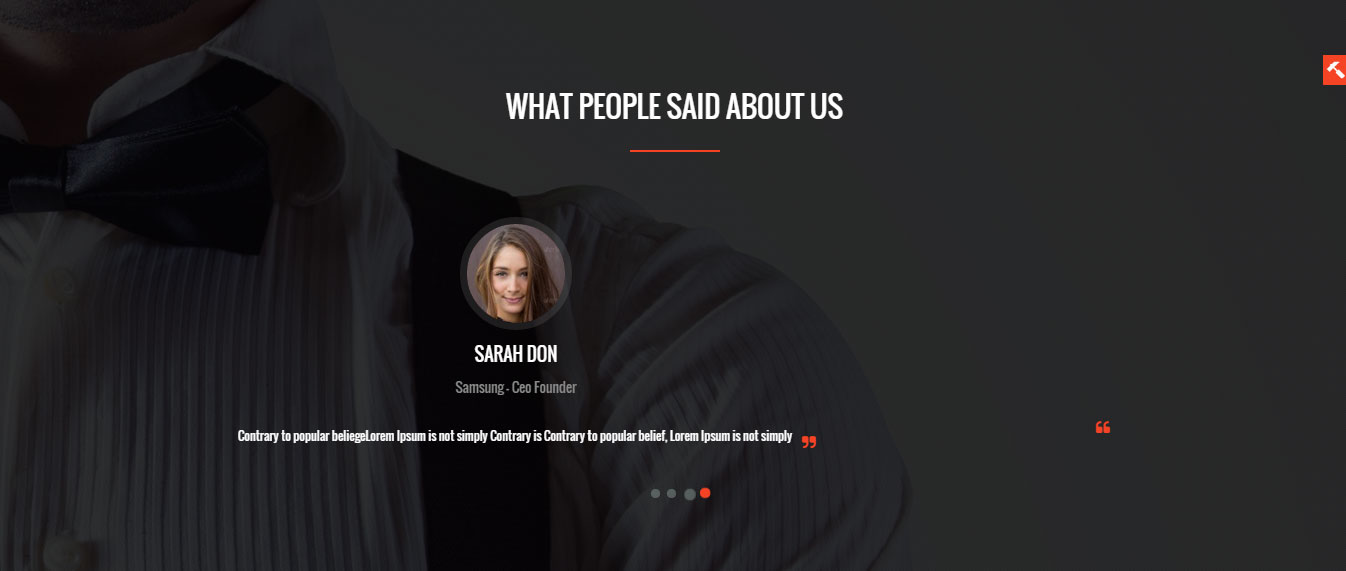
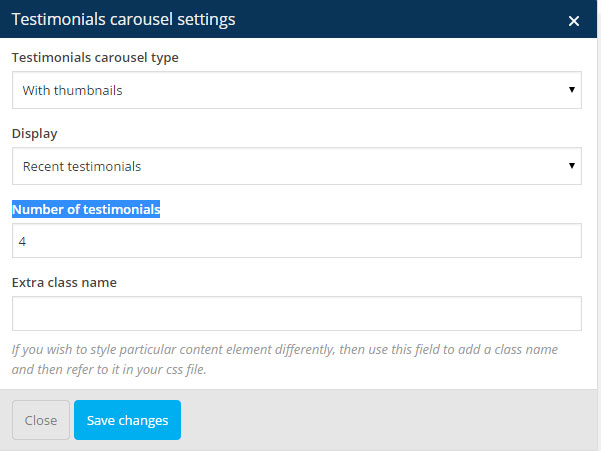
- Required plugin Testimonials by WooThemes
- Edit row settings from field Choose extra CSS class select Add pattern to transparent this need to create custom background image for this block and select darkness.
- From popup Visual composer click tab by samathemes and select Testimonials Carousel.
- Field Testimonials carousel type : select With Thumbnails.
- Field Display : select recent Or by IDS.
- Field Number of testimonials : EX: 4.
Testimonials Carousel Style 2 -Block 11
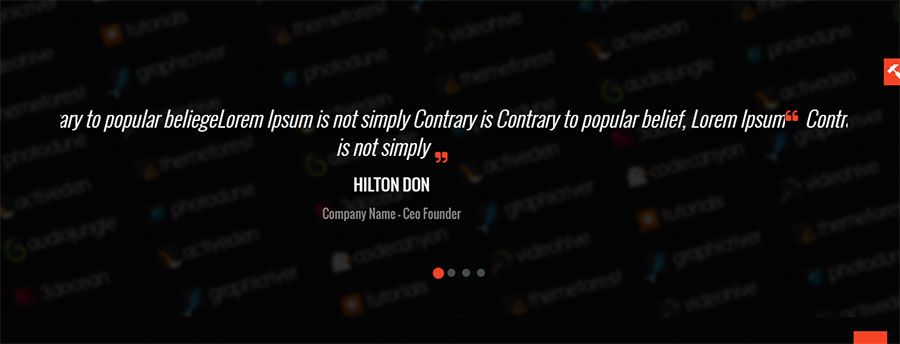
- Required plugin Testimonials by WooThemes
- Edit row settings from field Choose extra CSS class select Add pattern to transparent this need to create custom background image for this block and select darkness.
- From popup Visual composer click tab by samathemes and select Testimonials Carousel.
- Field Testimonials carousel type : select Without Thumbnails.
- Field Display : select recent Or by IDS.
- Field Number of testimonials : EX: 4.
Block 12
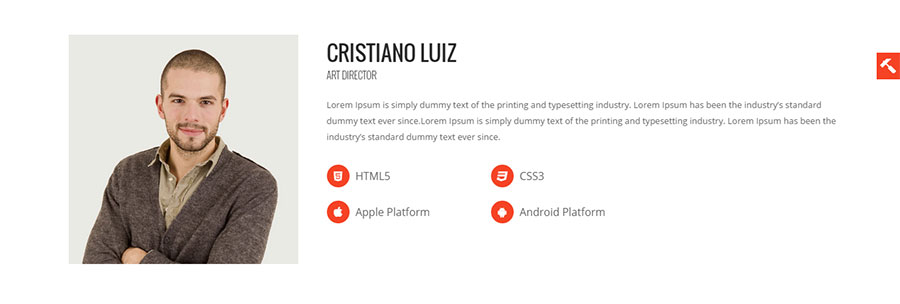
- Edit row settings from field Choose extra CSS class select Details.
- make your row 2 column.
- Column 1
- Add text block inside column and insert image and add CSS Class [img-responsive] to image.
- Column 2
- Add text block inside column and insert your content.
- To create List with icon copy this code.
<h2>CRISTIANO LUIZ</h2><h5>Art Director</h5>Lorem Ipsum is simply dummy text of the printing and typesetting industry.<ul class="list-overview"> <li><i class="fa fa-html5"></i> HTML5</li> <li><i class="fa fa-css3"></i> CSS3</li> <li><i class="fa fa-apple"></i> Apple Platform</li> <li><i class="fa fa-android"></i> Android Platform</li></ul>
Image OWL Carousel -Block 13
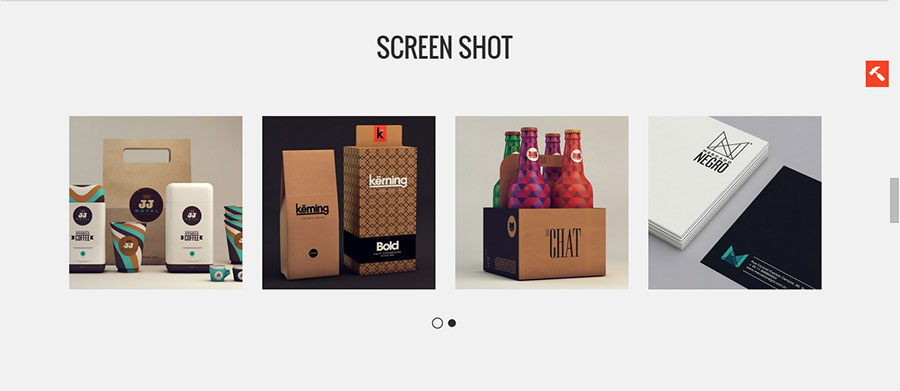
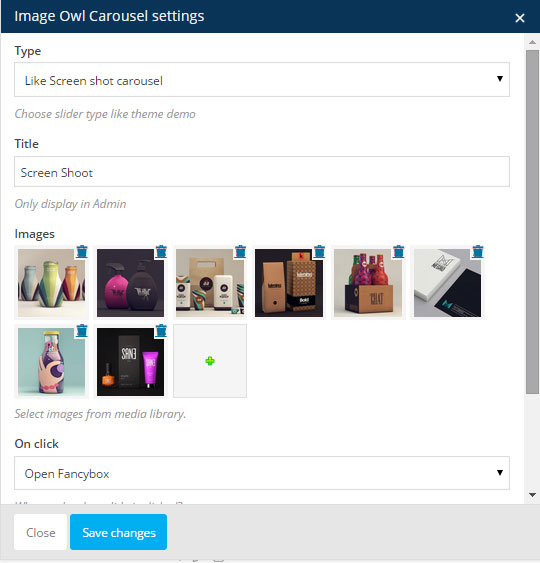
- From popup Visual composer click tab by samathemes and select Image OWL Carousel.
- Field type : select Like Screen shot carousel.
- Upload your images.
- Field On click : select Open Fancybox.
Progress bar -Block 14


- From popup Visual composer click tab by samathemes and select Progress bar.
- Field title : EX: Web Design.
- Field value : EX: Web Design.
- Field unit : EX: %.
- Field Bar color : default.
Progress bar style 2 -Block 14
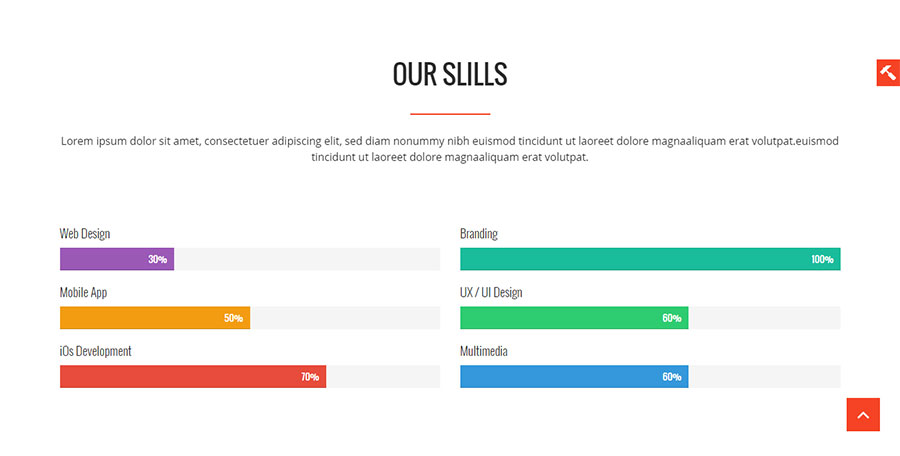
- view.
- Field Bar color : Choose any color from dropdown menu.
Text With Black Bacground -Block 15

- Edit row settings from field Choose extra CSS class select Welcome Box with dark background.
- Edit row settings and from theme extra options tab for field Box Background select darkness and field Background Opacity Overlay select no.
- Add text block and add your content EX:
<h3>NEED A PROJECT ? Don't GO AWAY ! CONNECT WITH US <a class="panel-button" href="http://demo.samathemes.com/rozana/contact-us-pages/contact-us-style-3/">CONTACT US<a></h3>
Feature List 2 -Block 16
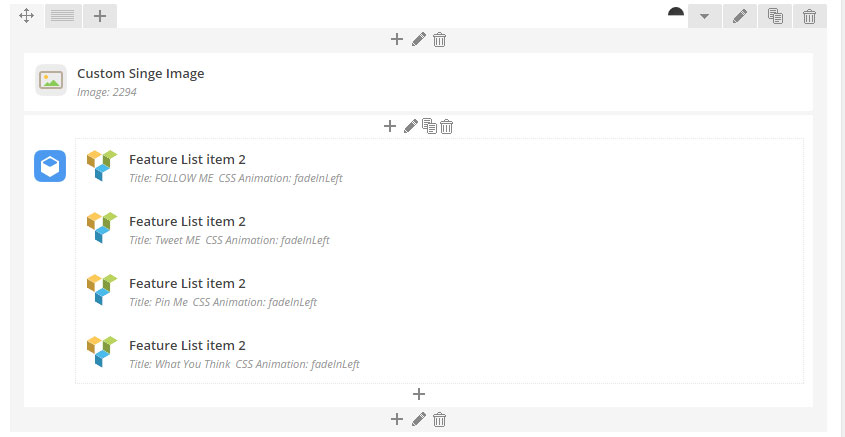
- Column 1
- From popup Visual composer click tab by samathemes and select Custom Single image.
- Upload your image.
- Field min Height : EX: 625px.
- Field Width : EX: 100%.
- Column 2
- From popup Visual composer click tab by samathemes and select Feature List container 2.
- Click + button inside feature list container 2.
- select feature list item 2.
- Field Title: EX: FOLLOW ME.
- Field URL Link: EX: URL Link for face book.
- Field Left position: EX: 58%.
- Field Margin Top: EX:0.
- Field Featured Icon: select your icon like facebook.
- Field CSS Animation: FadeinLeft.
- Field CSS Animation Delay: 200.
- Repeat steps from 2 - 10 and change Animation delay to: 400, 600, 800.
Portfolio -Block 17
- Required plugin Projects by WooThemes.
- From popup Visual composer click tab by samathemes and select Portfolio.
- Add number for portfolio items you need to display.
Text Block -Block 18
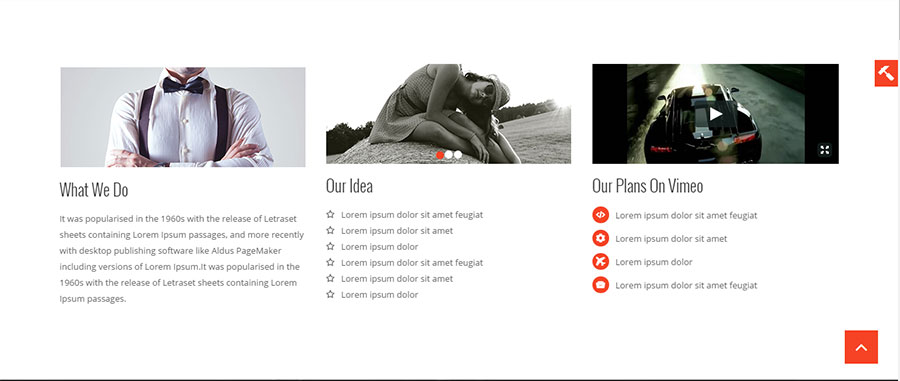
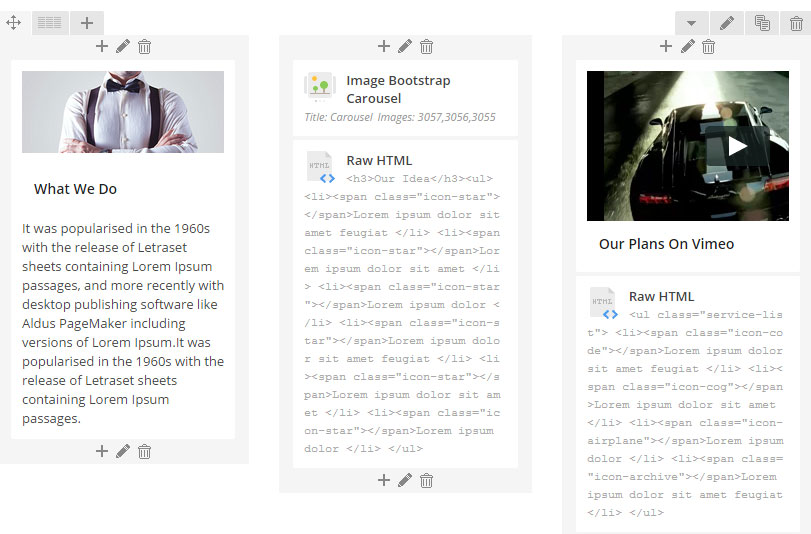
- Edit row settings from field Choose extra CSS class select Service Block.
- make row 3 columns like image above.
- Column 1
- From popup Visual composer select Text Block.
- Add your content.
- Column 2
- From popup Visual composer click tab by samathemes and select Image Bootstrap Carousel.
- Upload yor images.
- Field Show navigation arrows: no.
- Field Show pagination bullets: yes.
- From popup Visual composer select Raw HTML.
<h3>Our Idea</h3><ul><li><span class="icon-star"></span>Lorem ipsum dolor sit amet feugiat </li><li><span class="icon-star"></span>Lorem ipsum dolor sit amet </li><li><span class="icon-star"></span>Lorem ipsum dolor </li><li><span class="icon-star"></span>Lorem ipsum dolor sit amet feugiat </li><li><span class="icon-star"></span>Lorem ipsum dolor sit amet </li><li><span class="icon-star"></span>Lorem ipsum dolor </li></ul>
- From popup Visual composer click tab by samathemes and select Image Bootstrap Carousel.
- Column 3
- From popup Visual composer select Text Block.
- Add Your vimeo Video code or content.
- From popup Visual composer select Raw HTML.
<ul class="service-list"><li><span class="icon-code"></span>Lorem ipsum dolor sit amet feugiat </li><li><span class="icon-cog"></span>Lorem ipsum dolor sit amet </li><li><span class="icon-airplane"></span>Lorem ipsum dolor </li><li><span class="icon-archive"></span>Lorem ipsum dolor sit amet feugiat </li></ul>
Feature List -Block 19
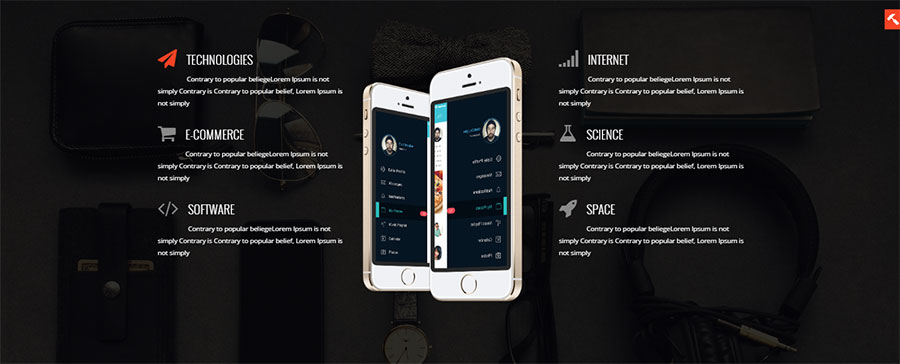
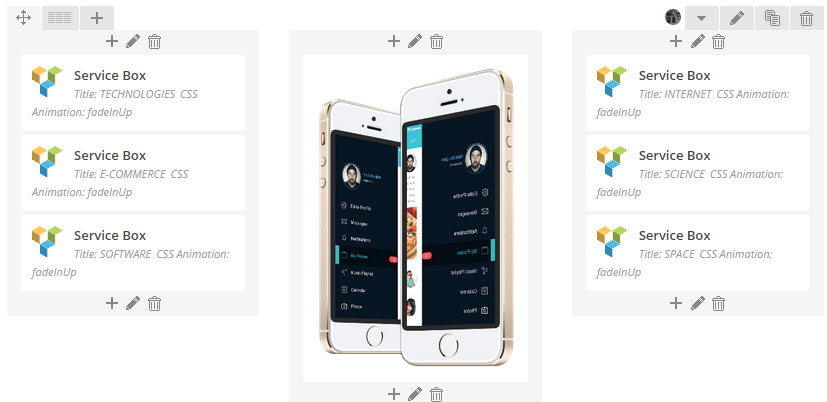
- make your row three column see above image.
- Column 1.
- From popup Visual composer click tab by samathemes and select Service Box.
- Field Title: Ex: TECHNOLOGIES.
- Field Icon Active: yes Or empty.
- Field Featured Icon: Select icon.
- Field CSS Animation: FadeinUP.
- Field CSS Animation Delay: 200.
- To Add more service box repeat this steps.
- Column 2
- From popup Visual composer select Text Block.
- insert image.
- Column 3.
- From popup Visual composer click tab by samathemes and select Service Box.
- Field Title: Ex: INTERNET.
- Field Icon Active: empty.
- Field Featured Icon: Select icon.
- Field CSS Animation: FadeinUP.
- Field CSS Animation Delay: 200.
- To Add more service box repeat this steps.
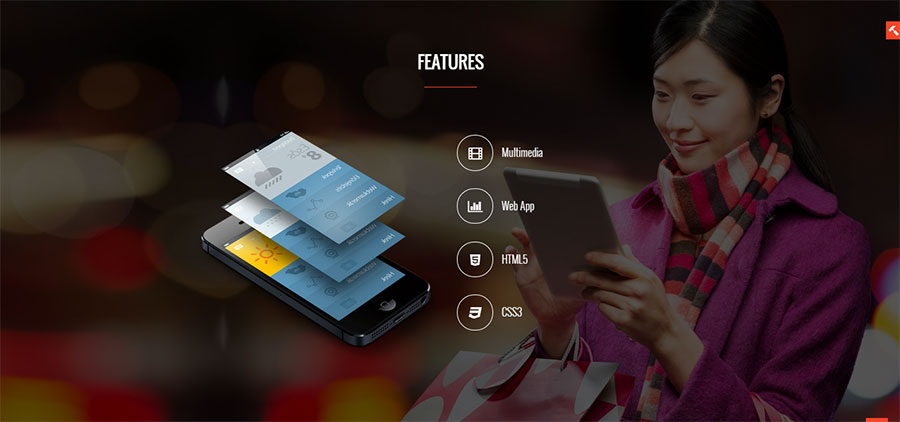
Tabs -Block 20
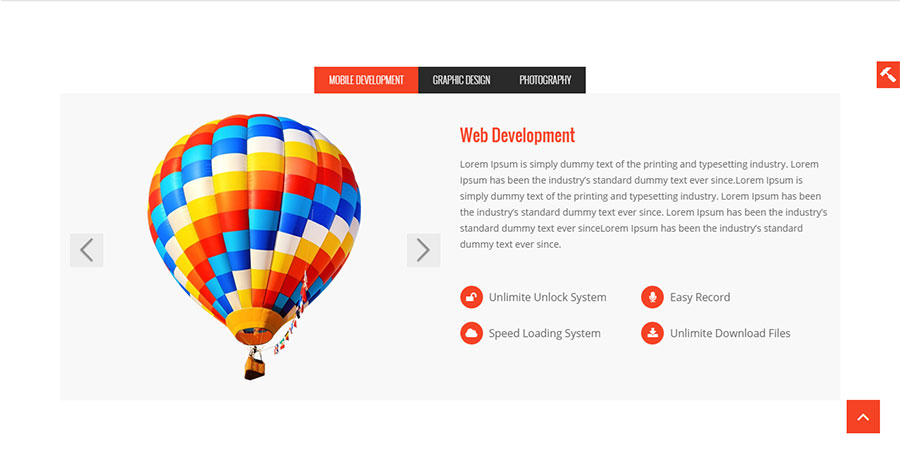
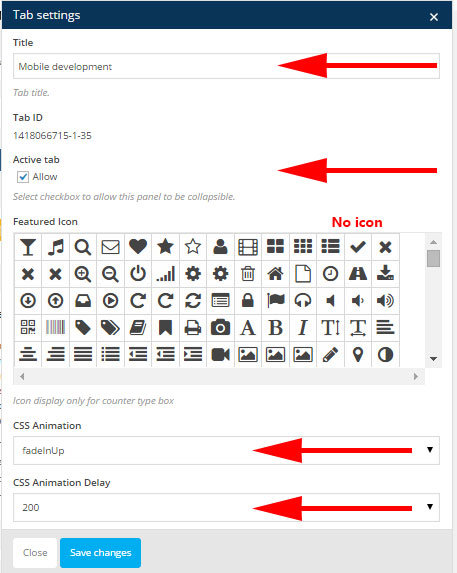
From popup Visual composer select Tabs and edit tabs settings and select style2.
Tab 1
- Add new row and make it 2 columns
- From popup Visual composer click tab by samathemes and select Image bootstrap Carousel and upload your images.
- For column 2 From popup Visual composer select text block and upload your content.
- to display list like demo add this html code inside content
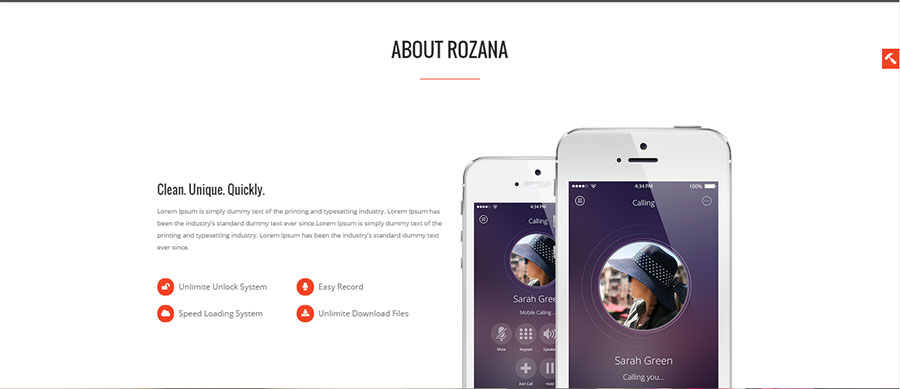
<h3>Web Development </h3>yourcontent <ul class="list-overview"> <li> <i class="fa fa-unlock "> </i> Unlimite Unlock System </li> <li> <i class="fa fa-microphone "> </i> Easy Record </li> <li> <i class="fa fa-cloud"> </i> Speed Loading System </li> <li> <i class="fa fa-download"> </i> Unlimite Download Files </li> </ul>
Tab 2 & tab 3
Add Text Block And Insert Your Content
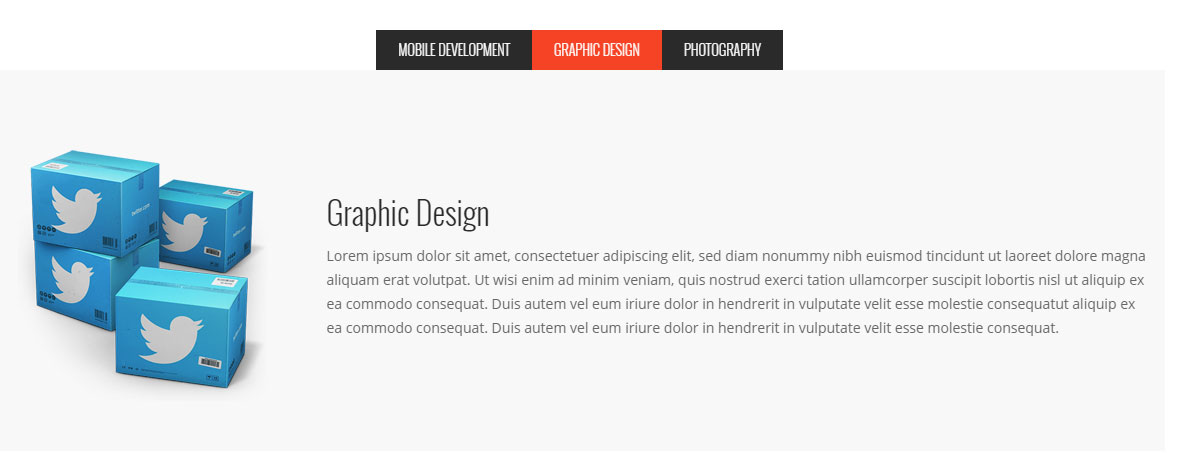
Tab Dark -Block 20
Here We create 2 tabs light and dark background
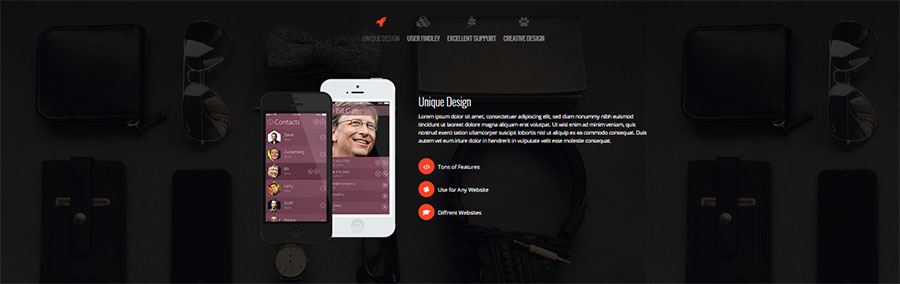
From popup Visual composer select Tabs and edit tabs settings and select style2.
Tab 1
- From popup Visual composer select Text Block and Add your content.
- to display UL list like demo add this html code inside text block content you create above
<ul class="list-features"> <li><i class="fa fa-code"></i>Tons of Features</li> <li><i class="fa fa-slack"></i>Use for Any Website</li> <li><i class="fa fa-mortar-board"></i>Diffrent Websites</li></ul>
Tab 2
Add Text Block And Insert Your Content
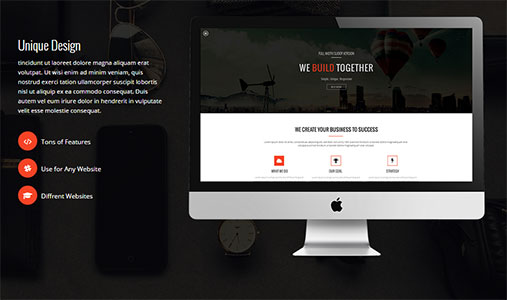
- From popup Visual composer select Text Block and Add your content.
- to display UL list like demo add this html code inside text block content you create above
<ul class="list-features"> <li><i class="fa fa-code"></i>Tons of Features</li> <li><i class="fa fa-slack"></i>Use for Any Website</li> <li><i class="fa fa-mortar-board"></i>Diffrent Websites</li></ul>
Tab 3 & tab 4
Add Text Block And Insert Your Content
Feature List -Block 21
- make your row three column see above image.
- Column 1
- From popup Visual composer select Text Block.
- upload your image and add cssclass to image image-responsive.
- Column 2
- From popup Visual composer click tab by samathemes and select feature list container.
- For feature list container settings field icon align select Right.
- Click Save changes.
- Click + button inside feature list container.
- Click feature list item.
- Click edit feature list item.
- Add your title ex: Multimedia.
- Icon Active empty.
- Featured Icon select your icon.
- Finaly Add animation.[fadeinup] , delay 200, 400,600,800, ..
Pricing Table -Block 22
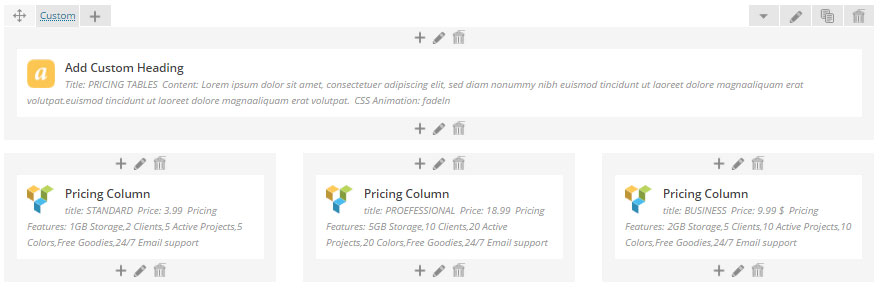
- If you need pricing table without no margin Edit row settings from field Choose extra CSS class select Pricing table without margin.
- make your row three column see above image.
- From popup Visual composer click tab by samathemes and select Pricing Column.
- Field title: Ex: STANDARD.
- Field Display hot icon: Select no OR Yes.
- Field Column Style: Select Dark or any vlaue from dropdown menu.
- Field Price: EX: 3.99.
- Field Currency: EX: 3.99.
- Field %: EX: per month.
- Field Pricing Features: [Input price column features here. Divide values with linebreaks (Enter)]
1GB Storage2 Clients5 Active Projects5 ColorsFree Goodies24/7 Email support
- Add content to othere fields.
Single Team Memeber -Block 23
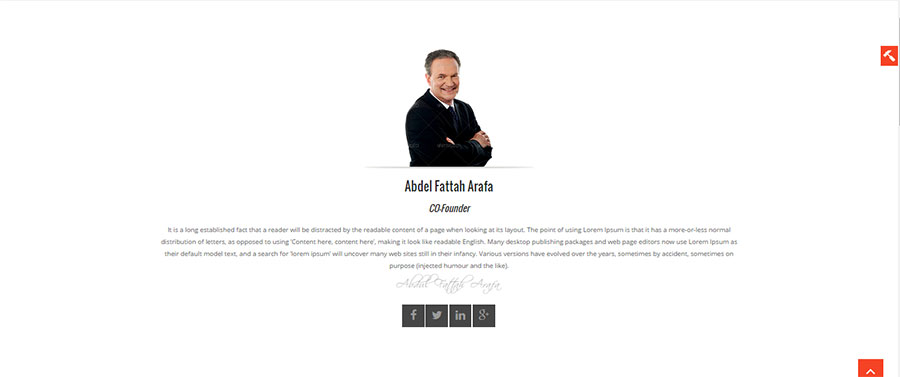
- From popup Visual composer select Text Block.
- Add Short Code team member.
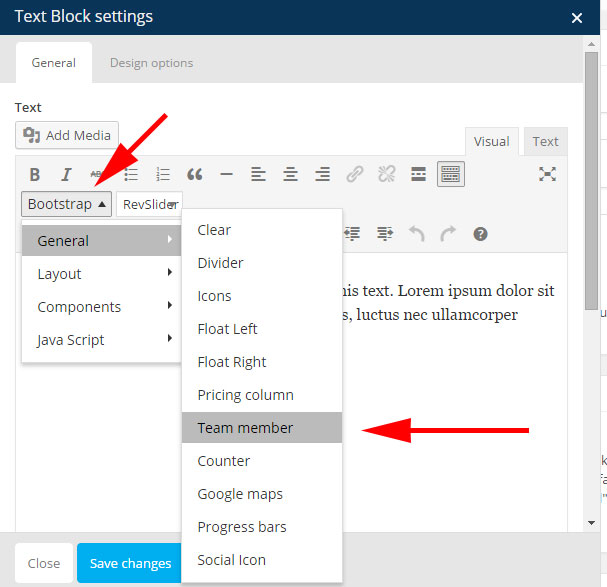
[sama_team_member style="style1" name="Abdel Fattah Arafa" role="CO-Founder" image="url to image" facebook="#" twitter="http://demo.samathemes.com/rozana/" linkedin="#" gplus="#" cssclass=""]about you here<img class="aligncenter size-full wp-image-2898" src="image url hrer" alt="signature" width="211" height="40" />[/sama_team_member]
Parllax Background -Block 24

- Add Parallax Background.
- Edit row settings from field Choose extra CSS class select Make H1, h2, h3 color White.
- From popup Visual composer select Text Block.
- Add This content or any content you need.
<h1>WE WILL PROUD FOR YOUR COOPRATE WITH OUR CREATIVE TEAM WORK</h1><a class="slide-btn" href="http://themeforest.net/user/samathemes">Connect Now</a>
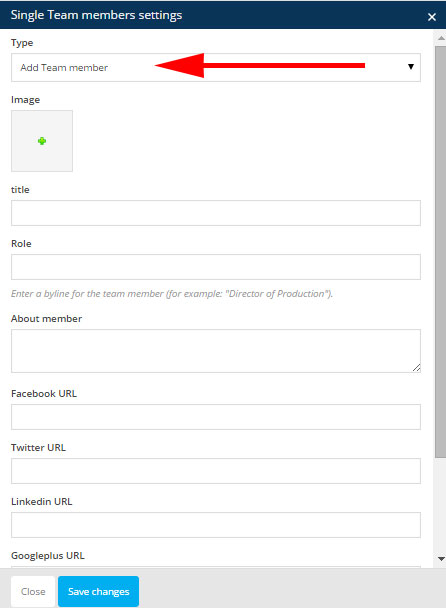
Single Team memeber -Block 25
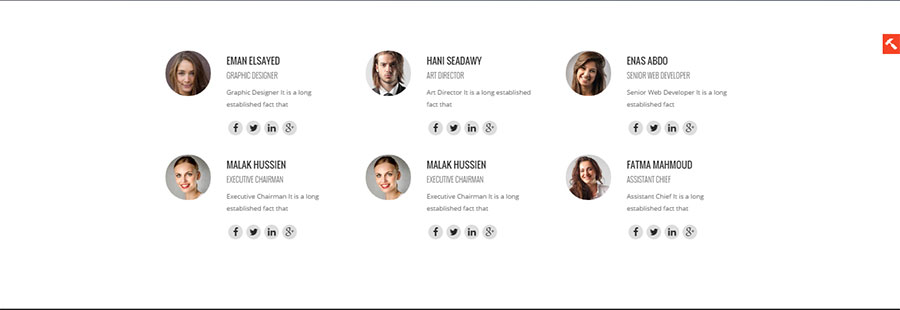
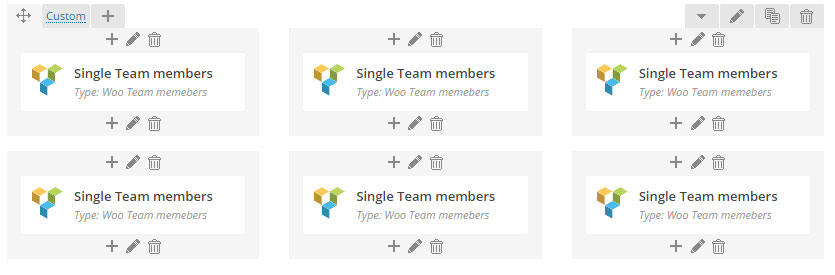
- If you need pricing table without no margin Edit row settings from field Choose extra CSS class select Pricing table without margin.
- make your row three column see above image.
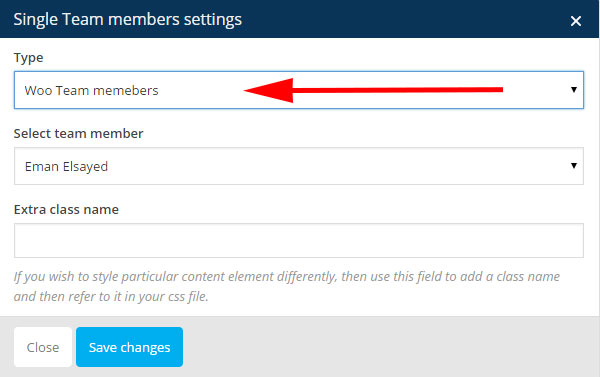
- From popup Visual composer click tab by samathemes and select Single Team member.
- Field Type: woo team memebers
- Field Type: Add team memeber
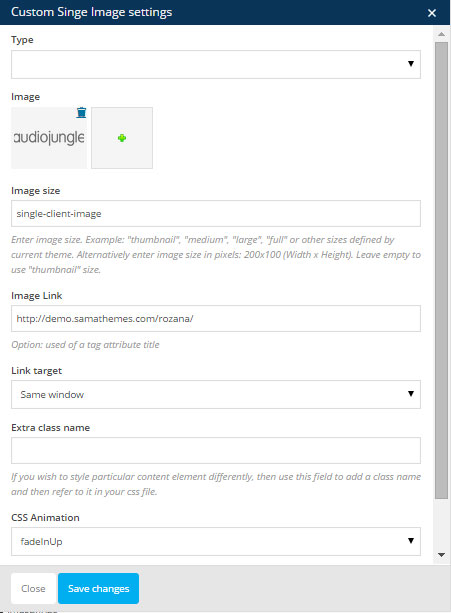
Client Images -Block 26

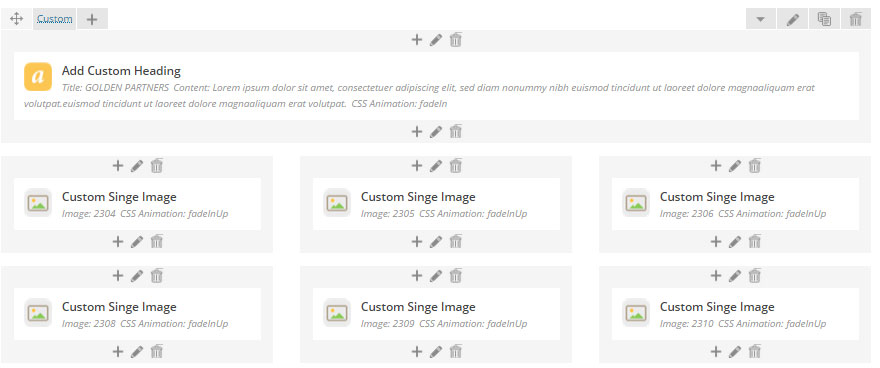
- From popup Visual composer click tab by samathemes and select Custom Single image.
- Field Type: empty
- Upload your image.
- Field Image size: single-client-image
- Add CSS3 Animation.
Branches With Accordions -Block 27
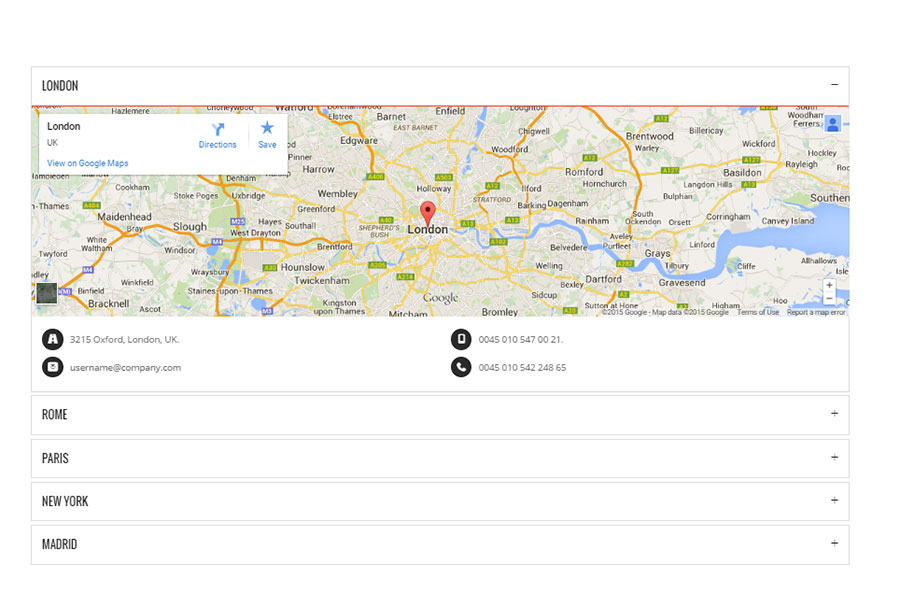
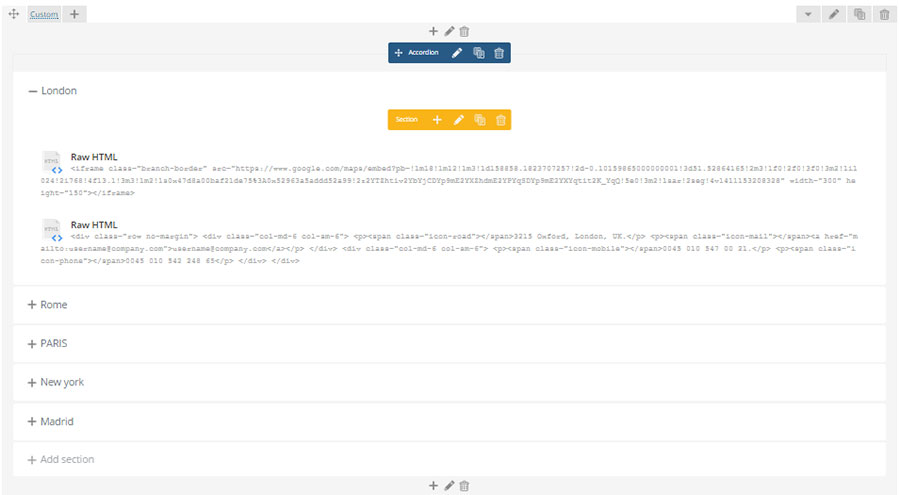
- Edit row settings from field Choose extra CSS class select Block have Accordions With Google maps.
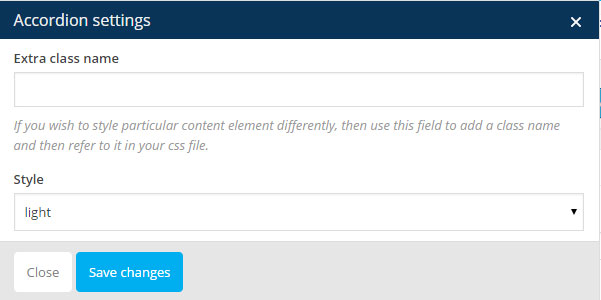
- From popup Visual composer select Accordion.
- Edit Accordion settings and from field style select Light
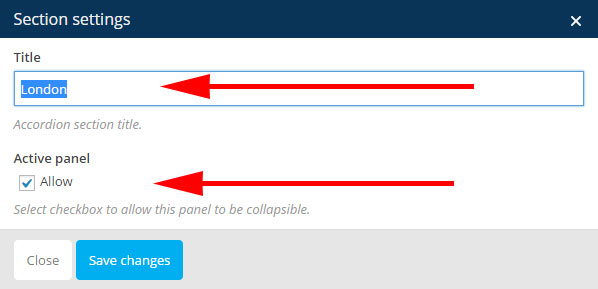
- Edit section 1 and change title to London and check active panel [active one panel from group panels].
- From popup Visual composer select Raw HTML and Add Embed code for google maps.
- From popup Visual composer select Raw HTML and Add content
<div class="row no-margin"><div class="col-md-6 col-sm-6"><p><span class="icon-road"></span>3215 Oxford, London, UK.</p><p><span class="icon-mail"></span><a href="mailto:username@company.com">username@company.com</a></p></div><div class="col-md-6 col-sm-6"><p><span class="icon-mobile"></span>0045 010 547 00 21.</p><p><span class="icon-phone"></span>0045 010 542 248 65</p></div></div>
Custom Google Maps -Block 28
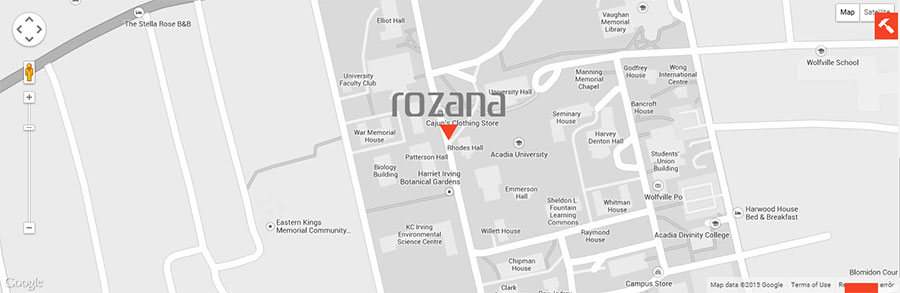
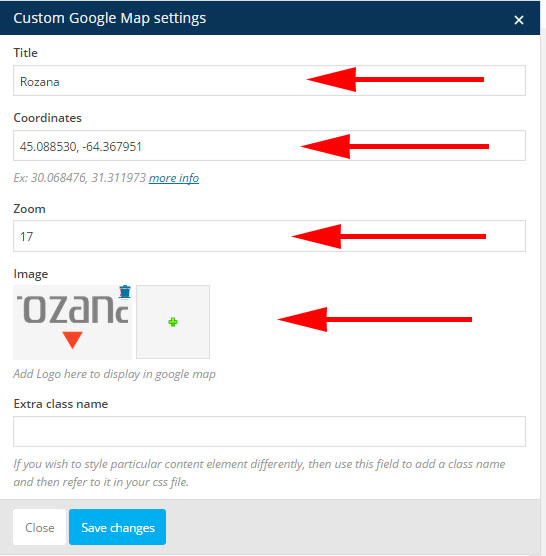
- Edit row settings and from theme extra options tab for field full width select Full Width Container.
- From popup Visual composer click tab by samathemes and select Custom Google map.
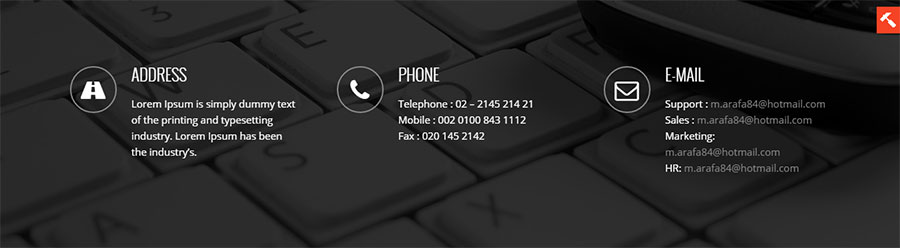
Contact Info -Block 29
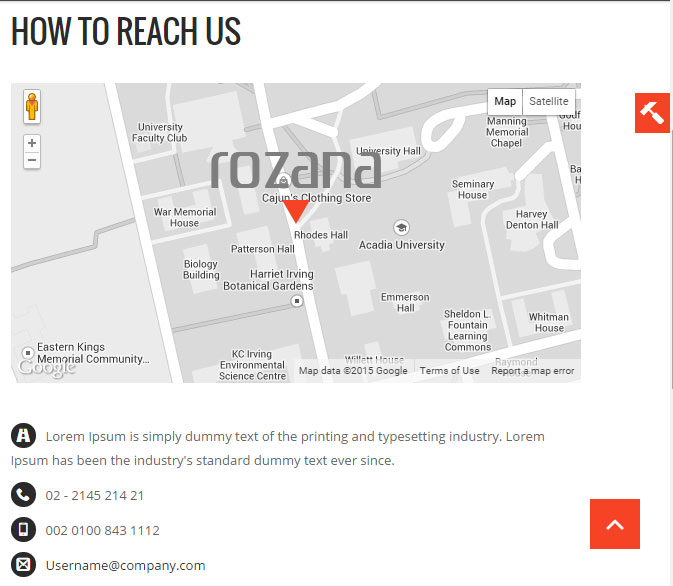
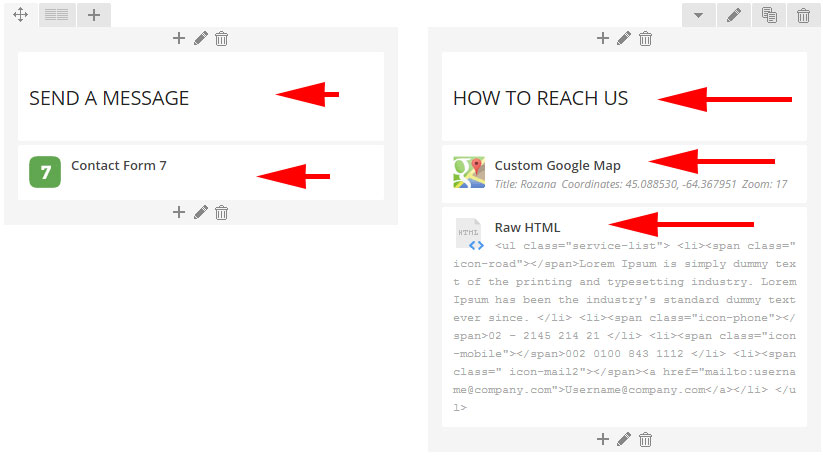
- Edit row settings from field Choose extra CSS class select Block have Contact us information.
- make your row 2 column see above image and add vc element like image.
- For Raw HTML add this content
<ul class="service-list"><li><span class="icon-road"></span>Lorem Ipsum is simply dummy text of the printing and typesetting industry. Lorem Ipsum has been the industry's standard dummy text ever since. </li><li><span class="icon-phone"></span>02 - 2145 214 21 </li><li><span class="icon-mobile"></span>002 0100 843 1112 </li><li><span class=" icon-mail2"></span><a href="mailto:username@company.com">Username@company.com</a></li></ul>
Text Block Dark Background -Block 30

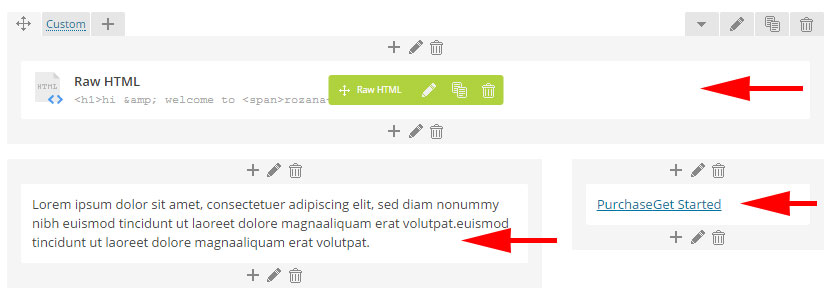
- Edit row settings from field Choose extra CSS class select Welcome Box with dark background.
- make your row like image above.
- For Button add this content in text block
<a href="#">Purchase</a><a class="scroll" href="#services-onepage">Get Started</a>
Text Block -Block 31
- Edit row settings from field Choose extra CSS class select Welcome Box with dark background.
- make your row like image above.
- For Button add this content in text block
<a href="#">Purchase</a><a class="scroll" href="#services-onepage">Get Started</a>
Text Block -Block 32
- Add Parallax Background.
- Edit row settings from field Choose extra CSS class select banners Block text.
- From popup Visual composer select Text Block and Add your content.
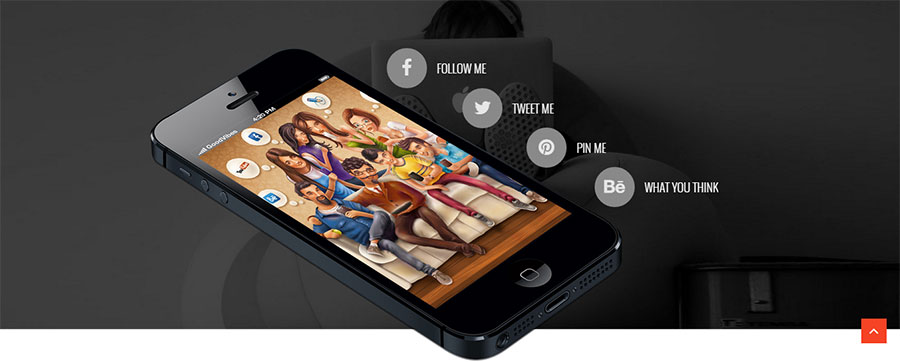
Icon Block -Block 33

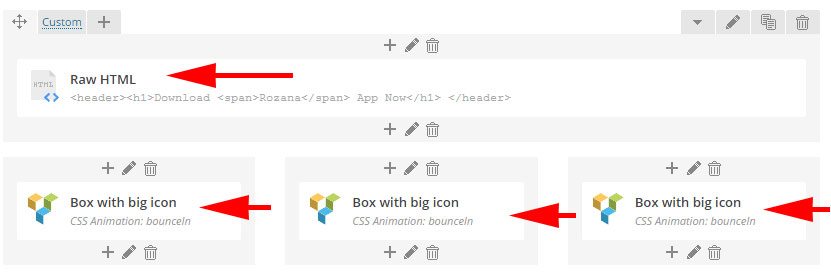
- From popup Visual composer select Row HTML
<header><h1>Download <span>Rozana</span> App Now</h1> </header>
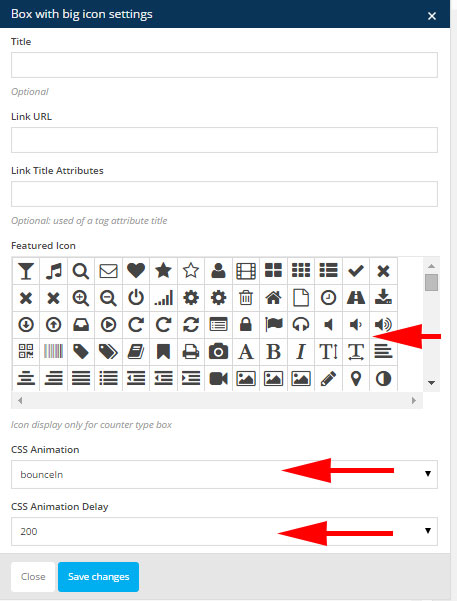
- From popup Visual composer click tab by samathemes and select Box with big icon.
- Field Title : empty you can add title if you need
- Field Link URL : empty
- Field Link Title Attributes : empty
- Field CSS Animation : bouncein
- Field CSS Animation Delay : 200
FAQ Style 1 -Block 34
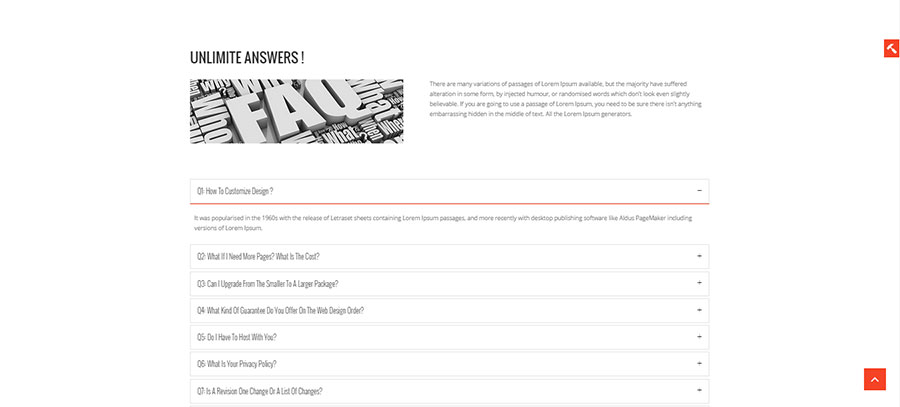
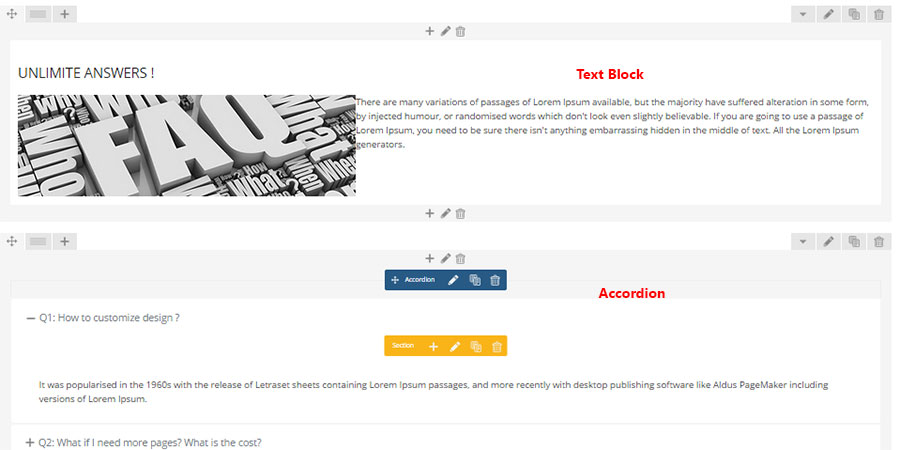
- From popup Visual composer select Text Block
- Edit row settings from field Choose extra CSS class select Block have Accordions With Google maps.
- From popup Visual composer select Accordion.
- Edit Accordion settings and from field style select Light
- Edit section 1 and change title to Q1: How to customize design ? and check active panel [active one panel from group panels].
FAQ Style 2 -Block 35
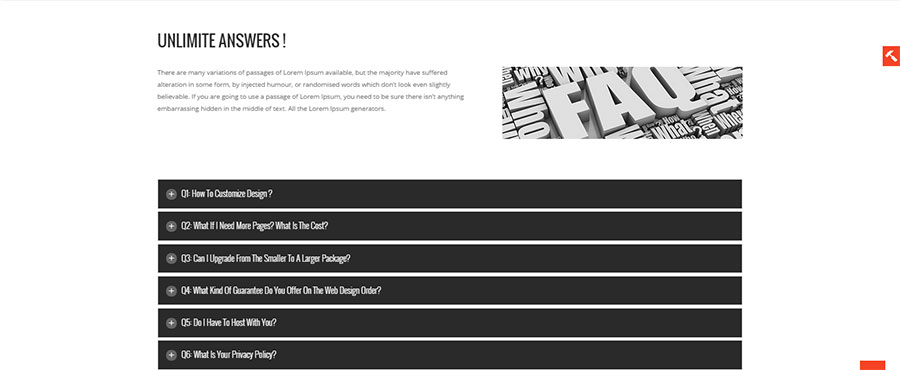
- FAQ Style 1
- From popup Visual composer select Accordion.
- Edit Accordion settings and from field style select dark
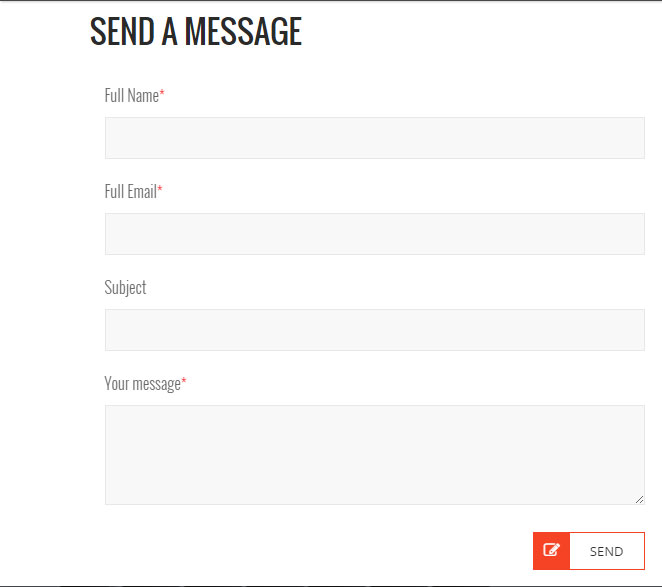
Contact Form -Block 36
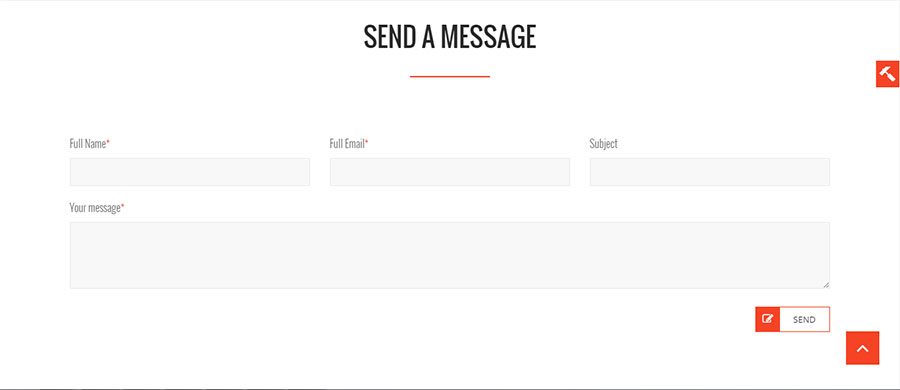
- Required plugin Contact Form 7.
- From popup Visual composer select Contact Form 7.
- Select contact form from dropdown menu.
- You can wrap code in contact form you create like this
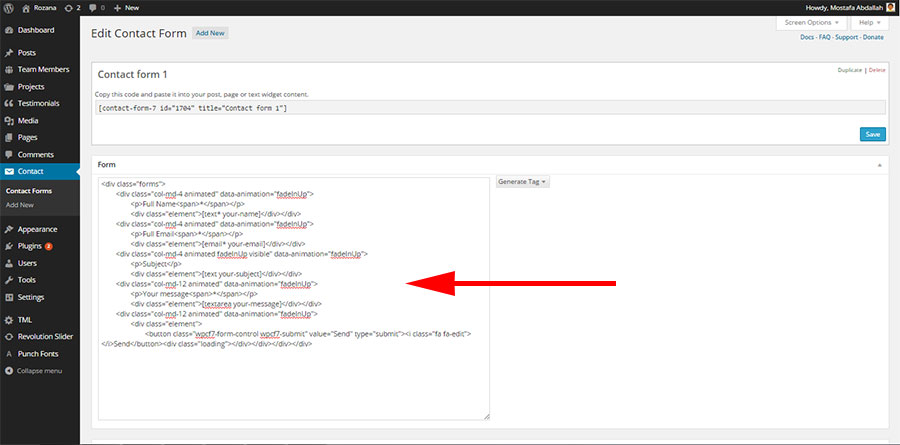
<div class="forms"> <div class="col-md-4 animated" data-animation="fadeInUp"> <p>Full Name<span>*</span></p> <div class="element">[text* your-name]</div></div> <div class="col-md-4 animated" data-animation="fadeInUp"> <p>Full Email<span>*</span></p> <div class="element">[email* your-email]</div></div> <div class="col-md-4 animated fadeInUp visible" data-animation="fadeInUp"> <p>Subject</p> <div class="element">[text your-subject]</div></div> <div class="col-md-12 animated" data-animation="fadeInUp"> <p>Your message<span>*</span></p> <div class="element">[textarea your-message]</div></div> <div class="col-md-12 animated" data-animation="fadeInUp"> <div class="element"> <button class="wpcf7-form-control wpcf7-submit" value="Send" type="submit"><i class="fa fa-edit"></i>Send</button><div class="loading"></div></div></div></div>
Contact Form styel 2 -Block 37
- Required plugin Contact Form 7.
- view Contact form.
- You can wrap code in contact form you create like this
<div class="forms"><div class="col-md-12 animated" data-animation="fadeInUp"> <p>Full Name<span>*</span></p> <div class="element"> [text* your-name] </div></div><div class="col-md-12 animated " data-animation="fadeInUp"> <p>Full Email<span>*</span></p> <div class="element"> [email* your-email] </div></div><div class="col-md-12 animated" data-animation="fadeInUp"> <p>Subject</p> <div class="element"> [text your-subject] </div></div><div class="col-md-12 animated" data-animation="fadeInUp"> <p>Your message<span>*</span></p> <div class="element"> [textarea your-message] </div></div><div class="col-md-12 animated " data-animation="fadeInUp"> <div class="element"> <button class="wpcf7-form-control wpcf7-submit" value="Send" type="submit"><i class="fa fa-edit"></i>Send</button><div class="loading"></div></div></div></div>
Add MailChimp
- From popup Visual composer select Text Block and inside it Add shortcode for mailchim form you create.
- wordpress admin > MailChimp for WP > Forms > Load form styles (CSS)? select No
- wrap code in form like this.
<div class="newsletter"> <div class="element"> <input type="email" id="mc4wp_email" name="EMAIL" placeholder="YOUR EMAIL ADDRESS" required /> </div> <div class="element"> <input type="submit" value="Sign up" /><i class="fa fa-heart"></i> </div></div>